How to fix plasterboard to a metal stud wall
'/%3E%3C/svg%3E)
Guide written on 6 February 2024 by:
Tess, painting & decorating consultant, Brighton
Important features
- Prepare to assemble
- Mark out the position of the partition wall
- Secure the metal studs to the floor
- Fit the metal studs
- Cut the plasterboard
- Fit plasterboard to one side of the partition
- Insert electrical conduits and insulation
- Fit plasterboard to the other side of the partition
- Joint the plasterboard
Metal stud framing for a quick and easy partition wall
Plasterboard is made up of a layer of plaster sandwiched by two layers of recycled paper. Lightweight and quick to assemble, plasterboard works in a wide range of locations whether you're working in an attic, bathroom or kitchen. Also known as drywall or gypsum board, plasterboard usually measures around 1200 mm in width but can stretch up to 1900 mm wide. It also comes in different heights, thicknesses and can be waterproof for kitchen or bathroom use.
If you secure plasterboard to a stud wall, insulation can be slid between the plasterboard and the wall to improve thermal and acoustic insulation. Metal stud walls are great for renovation projects as they are lightweight, easy to assemble and moisture-resistant. What's more, they won't be affected by insects like woodworm, unlike timber studs.
Steps
Prepare to assemble
Mark out the position of the partition wall
Secure the metal studs to the floor
Fit the metal studs
Cut the plasterboard
Fit plasterboard to one side of the partition
Insert electrical conduits and insulation
Fit plasterboard to the other side of the partition
Joint the plasterboard
Insulation
Prepare to assemble
The floor in the room you are working in must be clean, dry and perfectly level.
Be sure to leave the plasterboard in the room a few days before you attempt to fit it. This will help you to avoid any drastic changes in temperature or moisture levels which could damage the boards.
Finally, check you have all the equipment you need at hand.
Mark out the position of the partition wall
Use a tape measure and pencil (or marking chalk) to mark out the start of your partition wall on the ground.
Use a laser level to visualise the full length of the partition wall.
You can then use a chalk line to mark the length of the partition on the floor.
Use a steel track (or bottom plate) to mark out the width of the partition using a pencil or marking chalk.
Be sure to take note of your fixing points which should be set out every 600 mm or so.
Secure the metal studs to the floor
If possible, the track can be screwed to the floor. Otherwise use the correct hammer-in fixings for your floor.
Cut the track to size as required using electric shears or snips.
Drill into the track where you plan to fix it to the floor.
Put your fixings in place and hammer in the nails or screws along the length of the track. Follow the same process to fix your top track to the ceiling and check that the top and bottom track are plumb.
Screws
Fit the metal studs
Use a tape measure to measure the desired height of your partition wall.
Cut the studs to size as required using electric shears or snips.
Fasten your first metal stud against the wall by drilling into the stud and securing it using the correct plugs and screws for your surface.
Lay out the rest of your studs where they will be installed. There should typically be about 600 mm between studs. But this gap can be as small as 500 or even 400 mm if you want to ensure the stud wall is really secure.
Slot the studs between the top and bottom rail by rotating them about a quarter turn.
Check they are plumb using a spirit level.
Be sure that any pre-drilled holes in the studs are lined up correctly as this is where your electrical cables or conduits will be inserted.
Cut the plasterboard
If you need to cut your plasterboard, place your boards on a flat surface and score them using a utility knife (or a hand saw if they are thick enough) and a straight edge.
Please note: the height of your plasterboards must correspond to the distance between the floor and ceiling minus 1 cm.
Once you've scored the boards, trim off the excess using a block plane or simply tap on the end of the board. You can then cut out any holes where you want to insert dry lining boxes.
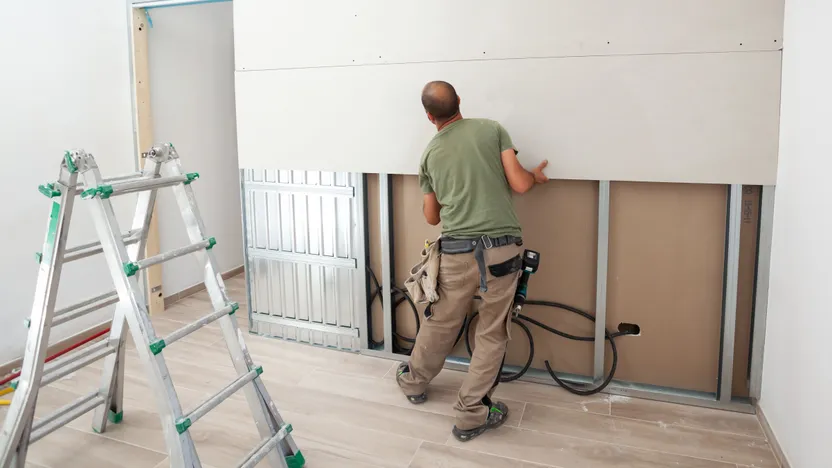
Fit plasterboard to one side of the partition
Place 1 cm wood shims along the length of the bottom track.
Then place the first plasterboard against the wall. The board must rest on the shims.
Screw the plasterboard into the studs around 1 cm from the edges using one screw every 30 cm.
Use plasterboard screws and the correct bit for the job.
You can use a drywall screwdriver or a cordless screwdriver with a screwdriver bit.
Continue to screw the plasterboards along the length of the stud wall, but only on one side.
Plasterboard screws
Insert electrical conduits and insulation
Feed your electric cables or conduits through the studs and secure them as required.
Measure the width between your studs and cut your insulation to size.
Place the insulation panels between each stud.
Insulation
Fit plasterboard to the other side of the partition
Follow the process described above to fit plasterboards to the other size of the partition wall making sure that the joints do not line up.
Similarly, ensure that your screws are not aligned to prevent them from coming into contact with the screws you fitted on the other side.
Don't forget to install dry lining boxes for your electrical sockets (if required).
Screws
Joint the plasterboard
If you are using a jointing compound that needs to be mixed with water, be sure to do so thoroughly using a drill fitted with a mixing attachment.
It is also possible to buy a pre-mixed compound.
Use a jointing knife or scraper to cover the joints with jointing compound.
Then apply the jointing tape working from top to bottom and applying the correct side if required (one side may feature a pattern in which case this side should go against the wall).
Smooth down the tape using a scraper to remove any air bubbles or excess jointing compound.
Another layer of compound should be applied about 6 hours to one day later, according to the manufacturer's instructions.
Cover all screw heads using the compound. Apply a finishing coat if required.
Once everything is dry, sand down the joints lightly and dust down your surface.
Don't forget to fill the gaps between the boards and the ground and any gaps between the wall(s) and the ceiling using acrylic sealant loaded in a caulking gun.
Take care to smooth down the joint once you're done.
Jointing compound
How to fix plasterboard to metal studs
Required skills
Taking measurements
Using a spirit level
Picking the right fixings and screws
Using a drill
Using a hole saw
Using a cordless screwdriver
Applying jointing compound
Sanding and dusting
Using hand tools like hammers, utility blades, snips, etc.
Good physical fitness
Mobility and ability to bend
Ability to work on a ladder
Required time
2 days, depending on the size of the wall
Number of people required
1 or 2 people
Tools and equipment
Tracks (or plates)
Studs
Wood shims
Planer for plasterboard
Insulation knife
Scraper
Safety wear
Dust mask
Please note: this is a non-exhaustive list; be sure to match your personal protective equipment to the job at hand.
Hammers
You may be also interested in these guides
Guide written by:
Tess, painting & decorating consultant, Brighton