How to paint a wall
'/%3E%3C/svg%3E)
Guide written on 6 February 2024 by:
Anne, Painter, Cambridge
Important features
- Preparing your workspace
- Preparing the paint
- Painting tricky areas
- Applying the first coat
- Applying the second coat
- Finishing touches and cleaning up
Freshen up your walls with a lick of paint
Want to switch up the decor in your room? Fast to apply and available in an endless variety of colours, paint is the most popular way to transform your interior walls. The advantage of using paint is that there are countless design possibilities from matching shades in the same colour family to combining contrasting shades. Similarly, you might choose to paint just one wall, create a panel of colour around a bed head or paint a diagonal wall design. Basically, the options are endless.
Steps
Preparing your workspace and the surface
Applying an undercoat
Preparing the paint and painting tools
Painting tricky areas
Applying the first coat
Applying the second coat
Finishing touches and cleaning up
Paint brushes
1. Preparing your workspace and the surface
All surfaces you plan to paint must be dry, and free of dust and flaking paint. Your walls must be absolutely clean! Follow the below steps to prepare your workspace and surface:
Before starting, remove all the furniture from the room; larger items can be moved to the centre of the room and covered with a sheet.
Protect your floor using a protective tarp held in place along the skirting boards with masking tape.
Fill in holes in the wall with multi-purpose filler and use fine surface filler for other imperfections in the wall. Then sand between the two applications of filler.
Apply masking tape along all skirting boards, doors and windows.
Cover up all plug sockets. Remove or cover curtain poles. That said, you do not necessarily have to apply masking tape – as long as you have a steady hand!
Check you have all the necessary equipment. Now you're ready to hop into your overalls or old painting clothes!
Masking tape
2. Applying an undercoat
The quality of the final result is a combination of good surface preparation, applying the paint properly and using good quality products (paint and tools). Applying an undercoat is not essential on all substrates, but it is strongly recommended. The application of an undercoat allows you to:
block the substrate or stabilise a porous surface;
reduce paint consumption as an undercoat covers the surface with an even, opaque white;
give an optimal paint finish;
apply paint easily as it adheres to the surface better.
There are 5 main steps to applying an undercoat, similar to paint:
Prepare the surface: it must be clean and free of dust and damp. Depending on the condition of the wall, a multi-purpose filler and fine surface filler may need to be used and sanded down after.
Protect other surfaces: apply masking tape to skirting boards, woodwork etc.
Apply the undercoat in corners and other difficult to access areas with an edger brush.
Apply the undercoat to the rest of the wall with a roller in vertical passes starting from the middle, then from top to bottom and from side to side.
Leave to dry: refer to the manufacturer's instructions and allow the necessary time for the undercoat to dry before the first coat of paint.
Not applying an undercoat may mean applying a third coat of paint.
3. Preparing the paint and painting tools
If you have applied an undercoat, your painting tools will be to hand. All you'll need to do is clean them before applying the first coat of paint.
You may have to clean your roller to remove any loose fibres; it is important to dry your roller properly or you will end up with water dripping down your walls! Another handy technique is to roll some tape around the roller to get rid of any loose fibres. Your choice of roller will, of course, depend on the type of paint you want to apply.
Open your paint pot and stir right to the bottom using a spatula or mixer mounted on a drill; the heaviest pigments often settle at the bottom of the pot so mixing will allow you to even out your paint.
Using a paint bucket or a paint tray will make your job easier.
Paint trays
4. Painting tricky areas
Start with any corners, the areas surrounding plug sockets and all difficult-to-reach spots with your edger brush, then follow up with your roller.
Do not apply too much paint and make sure that your edges are not too wide or your paint strokes may show.
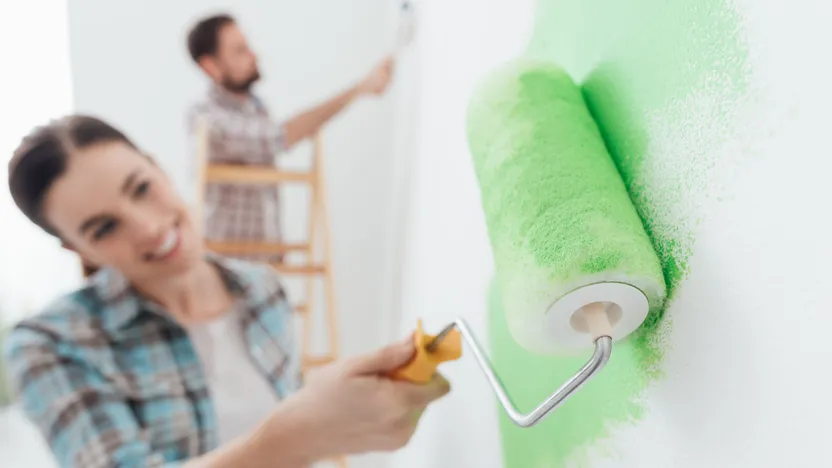
5. Applying the first coat of paint
Bear in mind that outdoor pollutants (dust, pollen, insects, etc.) may get stuck on freshly applied paint, depending on where you are painting.
Some paints release Volatile Organic Compounds (VOCs) so be sure to wear a protective mask and take care to ventilate the room you are working in. If you are using a paint thinner other than water, pay extra special attention and wear personal protective equipment. Then follow these steps:
Apply your paint from top to bottom and from left to right. This way, you'll be able to lean on the wall with your right hand as you work. Of course, you should work in the opposite direction if you are left-handed!
Make sure that your roller is properly wiped off when you are applying paint at an angle to avoid any unsightly paint drips. At the same time, don't try to stretch your paint too far; you need to find the right between a layer is thick enough to cover the wall but not too thick as to cause drips.
Do not wash your roller between coats. Instead, pop it in a tightly sealed plastic bag or wrap it in cling film to stop the paint from drying out.
Paint thinners
6. Applying the second coat
Once the first coat is dry, look out for any imperfections (by touching or just looking at the surface) and proceed to lightly sand down any mistakes.
Otherwise, follow exactly the same procedure as the first coat starting with the edges.
Depending on the surface and the quality of the paint, you may find yourself applying less paint for your second coat.
7. Finishing touches and cleaning up
Once you've finished, remove all masking tape before the paint dries. If you forget to remove the tape before the paint is dry, cut it using a cutting knife before removing it to break the paint seal.
Wash your tools, removing any excess paint from your roller using a paint scraper. If you clean your tools properly, you will be able to use them again!
Remove your floor protection, throw out any waste and air out the room to avoid any ill effects from VOCs.
Your paint pot should be closed tightly with cling film placed over the surface of the paint to preserve the paint as best as possible.
Dispose of any recyclable materials at a recycling centre.
Utility knives
How to paint a wall
Required skills
If you want to paint a wall, you will have to know how to handle a roller! With all the different types of paint and handy tools on the market, just about anyone should be able to paint a wall without much bother. If you are reluctant to climb up a stepladder to reach the tops of your walls, you can get your hands on a wonderful gadget called a roller extension pole. You can even find miniature telescopic rollers for the times when you need to reach parts that are just out of your reach. Your feet will stay firmly on the ground while the brush or roller on the end of your pole will do all the work for you!
Time required
Approx. 6 hours per 10 m²
Number of people required
1 person
Tools and accessories
Paint and undercoat
Paint scraper
Protective tarp and paint coveralls
Masking tape
10 to 12 mm roller and round bristle paint brush (for edges)
Paint bucket and sponge
Paint tray and paint mixer
Stepladder
Personal protective equipment
Safety shoes
Protective clothing
Dust mask
Please note: this is a non-exhaustive list; be sure to match your personal protective equipment to the job at hand.
Paint brushes
You may be also interested in these guides
Guide written by:
Anne, Painter, Cambridge
After 8 years of trade, I turned professional: I trained myself to be a painter and carpet fitter, either on my own or with 16 year old comrades. 9 months later, following vocational training, I created my company. I’m a self-taught DIYer and decoration enthusiast, I love to find and restore furniture and to create unique decoration pieces. I completed the renovation of my sister’s house with my niece: electrics, tiling, plasterboard...we did it all. And today, if I can share my experience I'm happy to do it. Good Luck.