How to install vinyl click flooring
'/%3E%3C/svg%3E)
Guide written on 6 February 2024 by:
Kate, Flooring Expert, Swansea
Important features
- Prepare the surface
- Fit a laminate or vinyl underlay
- Install your vinyl click floor
- Tips for cutting vinyl
Vinyl click flooring: a water-resistant floor on a budget
Vinyl planks and tiles have been on the market for a while now alongside more traditional options like hardwood and laminate. Cost-effective and easy to install, vinyl click flooring has really taken off in recent years and with good reason – these floors are water-resistant meaning they can be fitted in any room of the home, including kitchens and bathrooms.
On the downside, PVC does expand and contract so vinyl planks or tiles can disconnect if the surface beneath is uneven or the floor is not fitted correctly. To ensure you install your vinyl click floor properly, be sure to follow all steps carefully. The rules are the same for vinyl tiles and vinyl planks.
Steps
Prepare the surface
Fit a laminate or vinyl underlay
Install your vinyl click floor
Tips for cutting vinyl
Required skills
Anyone – even DIY novices – should be able to lay a click vinyl floor by following these steps. The only step that may require more skill would be if you have to repair a damage surface before starting installation.
Time required
Approx. one day for a 20 m² room
Number of people required
1 person
Tools and equipment
2-metre straight edge
Mallet
Safety and workwear
Please note: this list is non-exhaustive. Be sure to match your protective equipment to the job at hand.
Measuring squares
How to install vinyl click flooring
1. Prepare the surface
Whether you are installing vinyl planks or tiles, it is essential to start by preparing your surface. A vinyl floor requires an even smoother and more level surface than most other types of flooring.
Check that your surface is flat or take steps to level the floor.
Fill in any holes and cracks if required.
Clean your surface using a broom or vacuum cleaner.
2. Fit a laminate or vinyl underlay
Vinyl floors will usually require an underlay from the same brand as the floor itself. You can either fit your vinyl or laminate underlay in stages or fit the whole thing in one go following the manufacturer's instructions.
It's worth noting that a vinyl floor warranty will usually require you to install the vinyl or laminate underlay that they recommend. Be sure to check this before making your purchase. Underlays can come in rolls or in panels that fold out.
Proceed as follows:
Unroll the underlay over your surface.
Take care to tape the strips together to make sure the layer is watertight.
Do not glue the underlay in place.
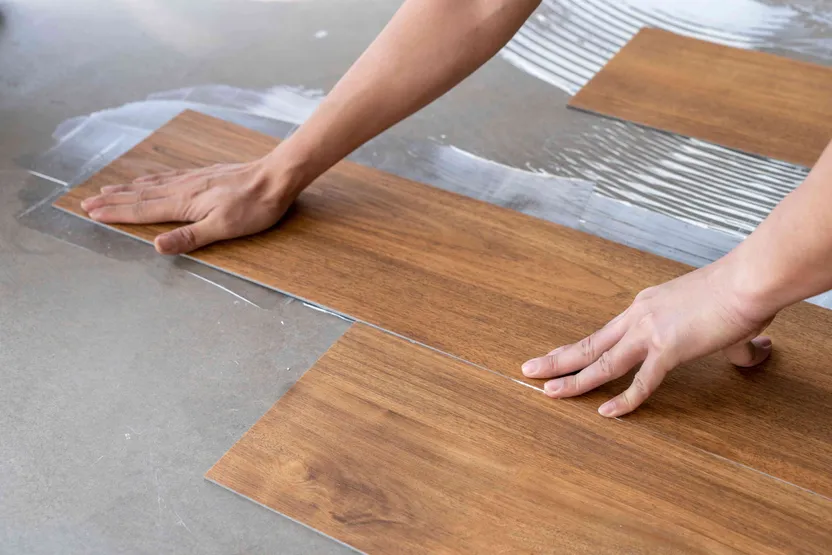
3. Install your vinyl click floor
Vinyl click flooring is fitted as a floating installation: the planks or tiles simply lock together and are not actually attached to the surface to which they are fitted. Most of the time, a vinyl click floor will be fitted in a staggered pattern. This means there will be very few offcuts and little material wasted.
Start fitting the floor in a corner of the room. Start with one full board making sure to place a spacer against the wall. These spacers are designed to leave an expansion gap around the perimeter of the room and should be used along every wall.
Clip the second plank so it is lined up with the short side of the first. It is very easy to slot these planks together – there's no need to force or bang them into place. Once you come to the end of the row, mark out where you need to cut the plank. Use a straight edge and utility knife to cut the plank. You just need to score the plank lightly to make a mark before bending the board. The board should then snap neatly along your cut.
Please note that your cuts should be made on the decorative side of the board and not on the underside. Use a pull bar and a mallet to fit the final board in the row making sure to maintain your expansion gap. A pull bar should allow you to slot the last board securely into place. Use the offcut from your final board to start the next row and keep locking the planks or tiles into place until your entire surface is covered.
Depending on your floor, you might need to use a tapping block and mallet to get the ends of the planks or tiles to fit together. However, avoid banging too hard to avoid damaging the locking system. Only use offcuts that measure over 30 cm and use a full plank instead where required.
4. Tips for finishing a click vinyl floor
There are lots of little tricks to help you trim boards in tricky spots such as around heating pipes, in corners and so on.
Remember that your vinyl click floor must not come into contact with any object in the room as it needs to be able to contract and expand easily. The expansion gap will eventually be covered up by your skirting boards, baseboard or scotia trim. The gaps around pipes or door frames can be covered using silicone.
That said, this isn't always the most attractive option and it's always best to choose other solutions whenever possible. For example, it can be a good idea to cut the base of door frames to allow your vinyl floor to slot neatly underneath. This way, the floor will be able to expand freely and the result will be much neater.
You may be also interested in these guides
Guide written by:
Kate, Flooring Expert, Swansea
Flooring is my life. I love what I do, and I've been doing it for as long as I can remember. So, I'm not bragging when I tell you I know all there is to know about every flooring product. From laminate, parquet and linoleum to PVC, carpeting and tiling, my workdays are spent learning about manufacturing processes, composition, performance, laying techniques and maintenance methods. I've certainly seen my share of mistakes made on construction sites because of what was essentially a lack of information or understanding of the product. Flooring elements are constantly evolving and being improved upon - even us pros can find it hard to keep up! Some of us in the industry use language that is overly technical or loaded with jargon you'd have to be an expert to understand. What's more, flooring salespeople are often so focused on closing the sale that they don't take the time to explain the products in any detail. That's why I want to pass on my knowledge in a way that's clear and accessible, and maybe a bit fun too. Because flooring shouldn't be a chore!