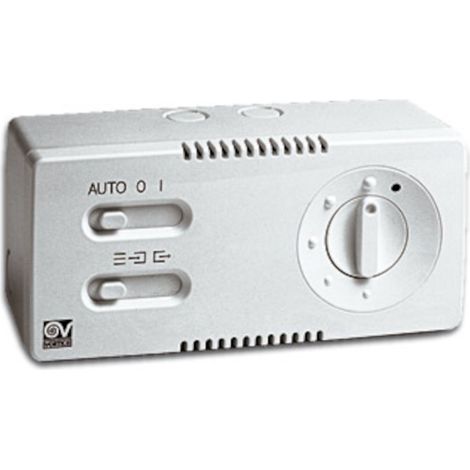
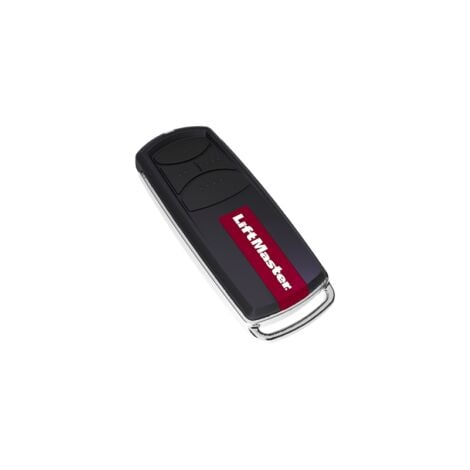
French: Features 1. Advanced Performance: Utilizes advanced microcomputer control, offering greater stability and full functionality compared to conventional controllers. 2. Motor Resistance Adjustment Button: Automatically stops the motor when it encounters significant resistance, ensuring safety and preventing damage to the gate. 3. High Sensitivity: The sliding gate opener control board features high anti-interference capability, precise control, simple operation, and a user-friendly design. 4. Motor Force Adjustment: Allows adjustment of the motor's operating force. When the gate encounters an obstacle during the closing process, it stops automatically, preventing accidents or damage. 5. Easy Installation and Use: Simple installation process and user-friendly operation make it convenient for both professionals and DIY enthusiasts. Specification Item Type: Sliding Gate Opener Control Board Material: Electronic Component Weight: Approx. 316g Scope of Application: Motor Controller Type: Automatic Gate Opener Applicable Product: Sliding Gate Product Size: Approx. Remote Control Learning Method: Press the remote control's learning button for 1 second, release it when the LED indicator 6 turns off, then press and hold any button on the remote control without moving. The indicator will flash three times to indicate completion. The remote control can then be used normally. The same method can be used to learn the second, third, etc., remote control. Removing the remote control password: Press and hold the controller's learn button for approximately 8 seconds, release it after hearing a prompt tone, and erase all previously learned remotes. You can relearn and use them using the remote control's learning method. Using the remote control: The controller can learn up to 300 codes. If the number exceeds this limit, no more controllers can be added. You can only delete a few before adding more remotes. Operating the remote control keypad: Pressing the direction (open, close) button on the remote control can move the motor. Pressing the stop button on the remote control can stop the motor or unlock the remote control keys. Manual keypad lock: When B2 is ON, pressing the lock button on the remote control will lock the controller (the stop indicator on the panel will flash), locking only the manual buttons and direction keys on the remote control. Press the remote control's stop button to unlock (the stop indicator on the panel will stop flashing). When the controller is locked, you must unlock it by pressing the remote control's stop button before using the remote control's directional keys and the controller's manual buttons. Manual Door Close Function Setting: Users can adjust the automatic door close function to suit their needs. When B3 is set to ON, the automatic door close function is enabled. When it is set to OFF, the automatic door close function is disabled. Automatic Door Close Setting Method: Pull the red jumper B3 and B6 to ON. Set the delayed door closing time by pressing the function key F (SN1) once for each additional second. After setting the desired time, B6 must be moved to the OFF position, and a beep will sound, indicating that the automatic door close time is set. External Manual Switch Wiring: Single-Button External Manual: An optional doorbell switch can be connected to the COM and ONE terminals. The single-button manual operates in cyclic mode: Open-Stop-Close-Stop. Card Slide Door Opener: Used specifically for the door opener function, the common line is connected to GND and the open line is connected to OP. Note: When using the card slider function, the controller can set the automatic door closing function to ensure the door closes after a delay (refer to Setting the Automatic Door Close). However, for safety reasons, infrared detection devices must be installed to prevent objects from being trapped during the automatic door closing. Travel Wiring: Travel can be selected using mechanical or Reed tube methods. The common travel line is connected to COM and the travel line is connected to OP and CL. Motor Wiring: The motor wiring must be done according to the main schematic. The motor's common line must be connected to the COM pin on the circuit board, and the direction wire is connected to L1 and L2. Otherwise, the motor may malfunction and rotate in only one direction. Setting the motor protection time: (This function must be used with B3 in a specific position. If the indicator does not turn off, you must turn off the device and enter this function again.) Once the door is installed (when the travel corresponds to the stop position), turn off the device for 5 seconds, then turn it back on. Immediately press and hold function key F for more than 5 seconds. Once the door has moved, release the button. The door will first open to the travel position, then automatically perform the closing action. After closing to the travel position, it will stop, thus completing the motor protection time setting. Finally, B6 must be moved to the OFF position.