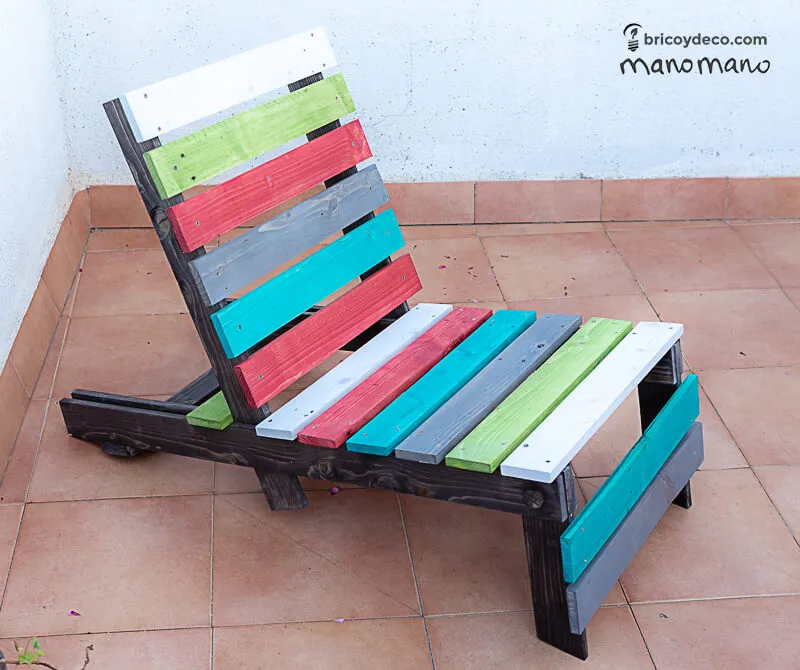
Folding DIY pallet chair tutorial
'/%3E%3C/svg%3E)
Guide written on 18 September 2026 by:
Mariluz, Blog writer for Bricoydeco
Tools and Materials
To make a DIY Pallet Chair you'll need the following:
Reciprocating saw or crow bar
Orbital sander and/or electric planer
Mitre saw or handsaw
Drill/ screwdriver
18mm drill bit for wood
Hammer
Pallets
Wooden rod measuring 18mm and 24mm
Mounting glue
Wood screws
Exterior paint
Paint brush
Cost, time and difficulty
This DIY project requires a certain level of skills when it comes to using electric tools, which is why we have given it a medium difficulty rating.
The approximate price of materials is around £20, although this might increase depending on how many different colours of paint you use.
It took us one day to make the chair, although half of that time was spent getting the pallet boards up to scratch. That's why, depending on the condition of the boards you have, the time to make this may a bit more or a bit less!
How to make your Folding DIY Pallet Chair
This outdoor pallet chair has the advantage of being foldable so it takes up less space when not in use. Because of this, the chair is made up of two sections:
The backrest is made of 2 vertical pallet boards joined by several horizontal ones.
The chair is made of 4 pallet boards joined by several horizontally positioned boards, with a space to insert the backrest.
When not assembled, the backrest can be stored in the space between the boards on either side of the chair. Similarly, the front legs fold backwards and remain concealed in the space. When folded, the chair is easily portable.
Step 1: Dismantle the pallet
The first step is to dismantle one or more pallets (depending on the size). For this chair, we used a European pallet measuring 120×80cm. To dismantle them, you can use a crow bar or reciprocating saw. If you opt for the latter, remember that you'll need a blade that is suitable for cutting both wood and the metal nails.
Step 2: Sand or plane the pallet boards
Normally, pallet wood features numerous imperfections such as damp and splinters, etc. To remove these and achieve a more uniform surface, we planed the boards after dismantling them.
We recommend sanding the wood using an orbital sander afterwards. This will produce a much more uniform surface which is smoother.
Step 3: Cut the parts
Next, cut the boards using a mitre saw or handsaw. The parts you need to cut are:
4 boards measuring 100cm in length for the sides of the bottom section of the chair.
2 measuring 35cm in length at a 15 degree angle at one end, to serve as the folding front legs.
2 measuring 70cm long for the sides of the chair's backrest.
15 measuring 50cm for the crossbeams on the seat and backrest.
Step 4: Make a space for the front legs
Using the flat bit, make a hole at one end of the 4 side boards. A good trick to get them perfectly aligned is to stack the boards up and drill the hole through all of them at the same time.
Make a hole in each leg, but in such a way that when you rotate them to position them at a right angle so that they don't touch the top of the sides.
Step 5: Coat and decorate the wood
Before assembling your DIY pallet chair, we recommend protecting the wood and adding colour to it with paint. This lets you ensure that each piece is properly coated and fully protected from outdoor weather conditions.
Step 6: Assemble the folding legs
Once the paint has dried, it's time to assemble the folding legs. To do so:
Cut 2 pieces from the 18mm diameter wooden rod to a size equivalent to the width of 3 pallet boards together (in our case, 5cm).
Stack one of the side boards, one leg, then another side board, aligning the holes that you previously drilled with the flat drill bit.
Insert the rod, using a hammer if necessary.
Cut pieces of the 24mm diameter wooden rod to 2cm long.
Attach to the ends using mounting glue.
Step 7: Drill in the pieces of the seat and backrest
Drill the crosspieces of the seat and backrest. Begin with the seat, screwing on 6 boards and leaving a space of around 2cm between each one. Then, leave sufficient space to be able to insert the backrest, and screw on a board at the top for support, as well as at the bottom.
On the backrest, attach 6 boards leaving the same 2cm space between them. Remember that you should be able to insert the backrest between the side boards of the seat, making it a good idea to insert them now and ensure that the crosspieces are aligned.
Lastly, screw a couple of boards to the folding legs to prevent them from detaching when you sit down.
And there you have it - your very own DIY Pallet Chair! You must be proud :)
You may be also interested in these guides
Guide written by:
Mariluz, Blog writer for Bricoydeco
This article was written by: Bricoydeco and translated. Mari Luz authors the blog ‘Bricoydeco’, she is a DIY fanatic, lover of recycling and customising furniture. Her passion is giving a second chance to turn once forgotten things into unique pieces!
'/%3E%3C/svg%3E)