How to install a macerator toilet
'/%3E%3C/svg%3E)
Guide written on 6 February 2024 by:
Jeremy, Construction site supervisor, Cardiff
Important features
- Identify the connections and set up the pump
- Connect the toilet to the macerator
- Connect the pump to the soil pipe
- Get the macerator wired in and test the unit
How does a macerator toilet work?
A macerator is a type of sanitary appliance containing a pump. Fitted behind a close coupled toilet, the macerator sets about breaking down solids in the toilet when the flush is triggered before sending the effluent through a narrow waste pipe.
Macerators can also work to lift waste water. Installed in locations where there isn't enough fall to get rid of waste water using a conventional pipe, a macerator can also be used to lift water from a shower or basin located below the main pipe level.
Conditions for installing a macerator toilet
A macerator requires a fused spur in line with UK regulations. Fused spurs are permitted in the bathroom as long as they are located over three metres beyond the edge of zone one or outside of zones 1, 2 and 3.
A macerator toilet should generally only be used as an additional toilet and not as the main toilet in a household. It is also important to remember that in case of power cuts, you will not be able to use the toilet.
Bear in mind that while you don't require planning permission to install, macerators have to comply with current Building Regulations and should therefore be connected to the mains by a certified tradesperson.
Two different types of pipe are used to carry away wastewater: a waste pipe which is used to carry grey uncontaminated water away from appliances (such as basins, showers, kitchen sinks, dishwashers and washing machines) and soil vent pipes which are used to carry water and solids from toilets. It is possible to connect a waste pipe to a soil pipe but you can never connect a soil pipe to a waste pipe.
If you need to lift the wastewater to a pipe situated higher than the appliance (for a shower in a basement, for example), you will have to ensure the pump outlet is fitted with a non return valve to prevent the water from backing up in the pump.
The macerator pump makes noise each time it is switched on which could prove bothersome to neighbours if your building is poorly insulated.
Steps
Identify the connections and set up the pump
Connect the toilet to the macerator
Connect the pump to the soil pipe
Get the macerator wired in and test the unit
Non return valves
1. Identify the connections and set up the pump
Identifying the connections
Macerators come with several connection points. Generally speaking, you'll find a large inlet in the middle of the pump designed to connect the pump to the toilet bowl where a pan connector would usually go.
On each side of the pump you will generally find smaller inlets. These connections are used to fit other sanitary appliances such as a shower or basin. A final connection is found on top of the pump which is the waste outlet of the macerator.
Setting up your macerator
You may not need to use all of these connection points and this all depends on how you want to use the pump. Your macerator should come supplied with a set of caps and pipe clips. Slide a jubilee clip over each rubber inlet and fit a cap to any that you don't plan to use.
Use a screwdriver to firmly secure the jubilee clips so that they hold the caps in place. Take care to secure the connections firmly as failure to do so can result in leaks and unpleasant odours escaping.
Macerators and waste pumps
2. Connect the toilet to the macerator
Connecting the toilet waste
Insert the toilet waste outlet into the correct hole in the macerator and clamp a metal pipe clip around the connection so that the rubber forms a perfect seal with the toilet. As close coupled toilets tend to have a wide outlet, you may find it tricky to fit into the macerator inlet. In this case, you can use some lubricant to make the pipe easier to slot into place.
Fitting the macerator
Place the toilet with the macerator connected into your chosen position and proceed to securing the assembly using screws and the right wall plugs for the installation surface.
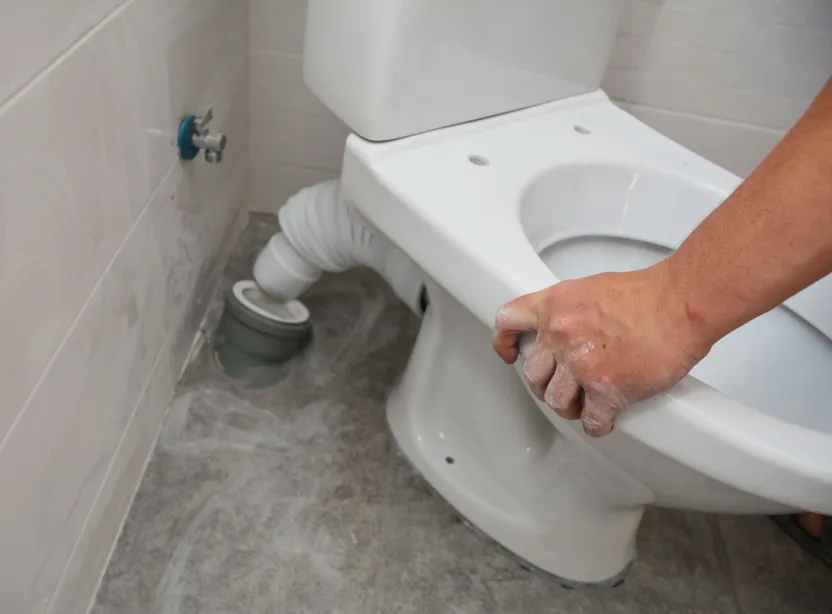
3. Connect the macerator to the soil pipe
You can then move on to fitting the macerator to the soil pipe using PVC pipe and pipe fittings such as elbows and straight couplers, as well as specially designed pipe clips and PVC adhesive.
Connecting the water
As the PVC adhesive is drying ensure everything is in place to connect the toilet back to the water, but do not fill the cistern back up at this point.
4. Get the macerator wired in and tested
Once the PVC adhesive is dry, it's time to get the toilet wired in.
Any electrical work in bathrooms must be performed in line with Building Regulations. This means that while you can complete the work yourself, it will need to be signed off by a qualified electrician. We strongly recommend that you hire a certified tradesperson to wire the macerator to the fused spur and test the unit.
Checking for leaks
Once your toilet has been wired in and checked by a professional, you might want to carry out your own checks to confirm that the macerator is draining wastewater correctly.
Run your finger over each connection, the caps fitted to the pump and around your PVC pipe connections to ensure that there are no leaks.
Junction boxes
How to install a macerator toilet
Required skills
Fitting a macerator pump to a toilet requires a few skills, including being able to:
use a drill;
choose the right wall plugs;
fit and glue PVC pipe;
follow assembly instructions;
hire a qualified tradeperson to sign off the electrical installation.
Time and number of people required
1 to 4 hours
1 or 2 people
Tools and equipment
Safety and workwear
Head and ear protection
Please note: this is a non-exhaustive list; be sure to match your personal protective equipment to the job at hand.
Lubricants
More information on toilets and accessories
Close coupled toilet pans
You may be also interested in these guides
Guide written by:
Jeremy, Construction site supervisor, Cardiff
Electrician by trade, I first worked in industrial estates where I installed, wired and fixed a large number of electrical installations. After this, I managed a team of electricians for this type of work. 10 years or so ago, I turned to building and construction. From the modest family home, to gyms and theatres, I have been able to coordinate, audit and organise all sorts of construction sites. For 4 years now, I am restoring and building an extension to a bungalow in the heart of the Welsh countryside. My experience in manual work and my knowledge means I am proud to be of service. Terraces, interior design, roofing, plumbing, electrics, anything goes! My wife, daughter and I, built almost everything we have from scratch! So to answer all of your questions and advise you on choosing your tools? Easy!