How to install a cooker hood
'/%3E%3C/svg%3E)
Guide written on 6 February 2024 by:
Jeremy, Construction site supervisor, Cardiff
Important features
- Purify the air
- Prepare and/or remove the old cooker hood
- Wire the cooker hood
- Assemble the cooker hood components
- Test run the cooker hood
Cooker hoods: keeping indoor air healthy
An essential part of any kitchen, a cooker hood helps to keep the air free of cooking odours, steam and smoke. Cooker hoods are designed to be installed above the hob can be ducted or recirculating. To keep the cooker hood operating efficiently, it's important to keep the filters clean.
Steps
Prepare and/or remove the old cooker hood
Wire the cooker hood
Assemble the cooker hood components
Test run the cooker hood
Prepare and/or remove the old cooker hood
Removing an old cooker hood
Isolate the electricity supply to your cooker hood.
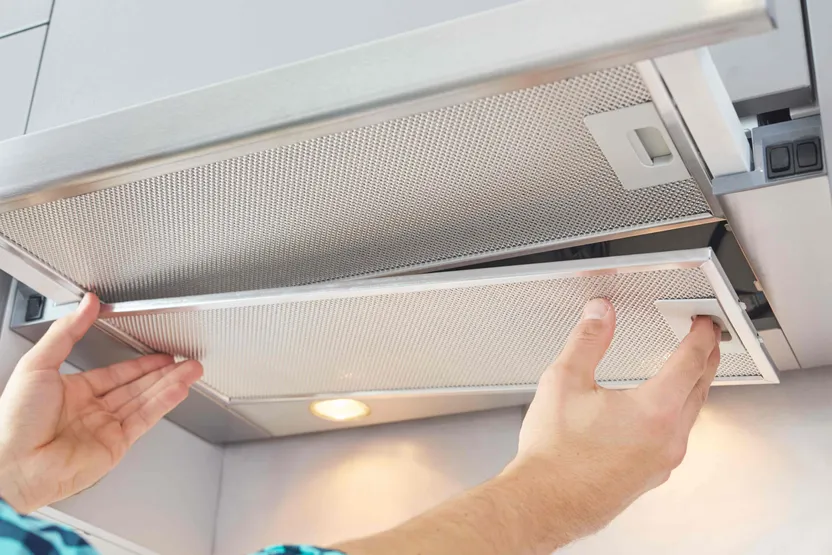
Remove the filters followed by the interior panel to access the electrical wiring. Disconnect the wires and remove the cable clamp if there is one.
Access the fixing screws and unscrew each of them while holding the cooker hood in position.
Remove the old cooker hood.
Preparing the new cooker hood
Refer to the manufacturer's recommendations to find out how to prepare your cooker hood.
Most cooker hoods require a few preparatory steps including:
removing the filters and the interior panel which hides the motor and fans;
removing the impeller fans to access the fixing screws;
identifying the opening used to feed through the electrical wires and breaking through the wiring knockout;
install the cable clamp;
turn the cooker hood over and remove the knockout for the duct connection (if you have a ducted cooker hood);
fit the duct cap (this part is usually designed to be screwed directly to the cooker hood but it is also recommended to seal the cap using caulk).
Electrical wire
Wire and fit the cooker hood
Fitting the cooker hood
Check that the duct cap fits firmly in position in the space for the duct.
Choose the right wall plugs for your surface and secure the cooker hood using screws.
Check that your installation is strong and stable.
Wiring the cooker hood
Cooker hoods can be connected to the electrics in a couple of ways.
Some cooker hoods come with plugs to be connected to a socket like any other kind of appliance.
However, more often than not, the cooker hood will be connected to a double pole fused connection unit leading to either a junction box or directly to the cooker hood. Follow the manufacturer's instructions on how to wire up the hood but only do so if you are 100% sure that you know what you're doing and remember to double check that the circuit is isolated properly before you start work.
If you have any doubts whatsoever you must hire a qualified electrician as improper wiring can be extremely dangerous.
Cooker hoods
Assemble the cooker hood components
Replace the parts that you removed for the preparation stage in the reverse order.
Fit the light bulbs if your cooker hood has lighting.
Fit the grease filters.
Test run the cooker hood
Turn the electrical circuit back on.
Test all the different features of the cooker hood including the light, the various power settings and so on.
If everything is working as expected, it's time to get your apron on and get cooking!
How to install a cooker hood
Required skills
In order to install your own cooker hood, you'll have to be able to read the installation instructions carefully, understand a wiring diagram, understand how to wire in the hood and use tools like wire strippers, screwdrivers and spanners. Depending on the set-up in your kitchen, you will probably have to use a drill and be able to choose the right type of wall plugs. If you have a ducted cooker hood, it's important to understand how to connect and seal your ducting.
Time required
Approx. 1 hour 30 mins.
Number of people required
1 or 2 people
Tools and equipment
Cooker hood with an installation kit.
Duct cap (if you are installing a ducted cooker hood)
VDE screwdriver
Box spanner (depending on model)
Safety and workwear
Please note: this is a non-exhaustive list; be sure to match your personal protective equipment to the job at hand.
Safety and workwear
More information
You may be also interested in these guides
Guide written by:
Jeremy, Construction site supervisor, Cardiff
Electrician by trade, I first worked in industrial estates where I installed, wired and fixed a large number of electrical installations. After this, I managed a team of electricians for this type of work. 10 years or so ago, I turned to building and construction. From the modest family home, to gyms and theatres, I have been able to coordinate, audit and organise all sorts of construction sites. For 4 years now, I am restoring and building an extension to a bungalow in the heart of the Welsh countryside. My experience in manual work and my knowledge means I am proud to be of service. Terraces, interior design, roofing, plumbing, electrics, anything goes! My wife, daughter and I, built almost everything we have from scratch! So to answer all of your questions and advise you on choosing your tools? Easy!