How to insulate internal walls
'/%3E%3C/svg%3E)
Guide written on 6 February 2024 by:
Patrick, Handyman, Bath
Important features
- Installing the metal frame
- Installing the furring channels
- Installing the insulation
- Installing the membrane
Internal wall insulation: a quick and practical solution
In construction and renovation, wall insulation improves thermal comfort and creates energy savings. This type of insulation is economical and quick to install, even by an amateur DIYer. It also avoids distorting the character of an old façade, for example.
If it's possible to use an adhesive thermal liner with insulation and plasterboard, installing on a metal frame does not require perfect flatness of the walls and reduces thermal bridges and eliminates condensation on cold walls. However, internal wall insulation does reduce living space.
Steps
Installing the metal frame
Installing the furring channels
Installing the insulation
Installing the membrane
Insulation
Installing the metal frame
The wall to be insulated must be sound, while the floor of the room must be clean, dry and level.
With a tape measure and a pencil, start by marking the location of the bottom rail on the floor, which corresponds to the thickness of the insulation + 2 cm.
Then use a chalk line to mark the entire length of the bottom rail on the floor of the room.
On the side of the wall you're insulating, place the rule on the floor marker in order to project its location on to the ceiling.
Check everything is in line with a spirit level and make a mark with a pencil.
Do the same on the other side of the wall.
Using the chalk line, now mark out the line for laying the top rail on the ceiling of the room.
Re-cut the bottom and top rails to the required length with snips, if necessary.
Be sure to use gloves.
Lay the bottom rail with the highest edge towards the inside of the room.
Then drill through the rail to the floor with a drill.
Then fix the bottom rail with hammer-in fixings and screws specifically adapted to the nature of the floor.
To do this, slide the fixings into the holes in the rail and hammer them in.
Then screw them in.
Repeat the same operation on the ceiling to fix the top rail, using fixings and screws adapted to the nature of the frame.
Installing the furring channels
Position the furring channel halfway up the wall and cut it back with snips if necessary.
If the ceiling is particularly high, this furring channel should be fixed at a maximum of 1.35 m from the floor.
Drill through the furring channel with a drill and fix it to the wall at regular intervals (about every 60 cm) using hammer-in fixings and screws.
Using a tape measure, measure the height of the wall and take off 1 cm.
Then transfer this measurement to the furring channels used to create the frame, which can be cut with snips if necessary.
Draw markers every 60 cm along the furring channel, which should be fixed halfway up the wall.
They mark the location of the fixing rods that hold the insulation and the vertical furring channels.
Slot the vertical furring channels between the top and bottom rails, every 60 cm at the markers.
With a tape measure, measure the distance between the intermediate furring channel attached to the wall and the vertical furring channels.
Transfer these measurements to the threaded rod of the fixing rods, then cut them to size using a grinder.
Remove the vertical furring channels, then clip the fixing rods every 60 cm on to the furring channel placed halfway up the wall.
Angle grinders
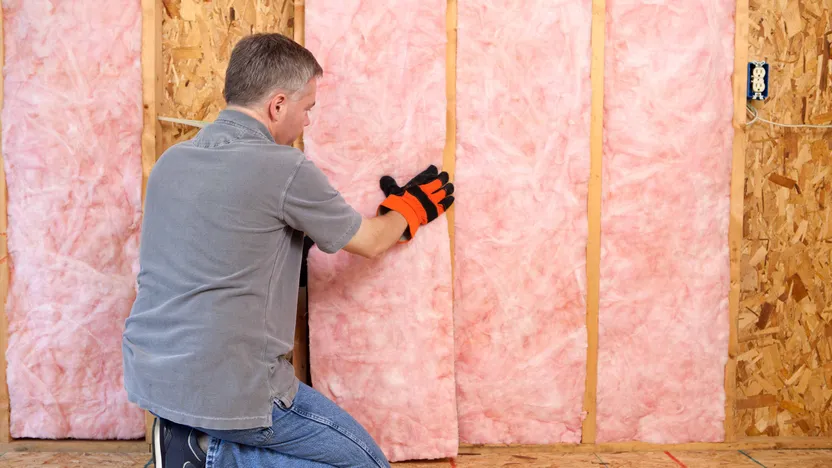
Installing the insulation
With your tape measure against the wall, measure the height from floor to ceiling and add 1 to 2 cm to it.
Open the insulation roll with a utility knife, taking care not to damage it.
Then transfer the measured height to the insulation and mark a cutting line with a pencil.
Carefully cut the insulation with a mineral wool knife, respecting the cutting line.
It is important to wear long-sleeved clothing and protective gloves as insulation can be an irritant.
Apply the insulation between the rail and the wall, ensuring that it is securely attached to all the fixing rods.
Attach the insulation by inserting the heads onto each fixing rod.
Ensure each one is in place.
Slot all of the vertical furring channels between the top and bottom rail, and clip them one by one into the heads of the fixing rods.
With a spirit level, carefully check that each vertical channel is in line, as well as the evenness between each channel.
If necessary, correct their alignment by moving the heads of the fixing rods.
Run the electric conduits between the insulation and the vertical furring channels.
Then attach them to these as required.
Installing the membrane
Fasten double-sided tape along the entire length of each vertical furring channel, unrolling it bit by bit.
Then measure the total area of the wall to be covered with damp-proof membrane.
Don't forget to add a 10 cm overhang around the membrane, but also between 2 panels.
With a utility knife, cut the membrane to the right size.
Then remove the protective film from the double-sided tape.
Stick the membrane to the vertical furring channels by carefully smoothing it down and ensuring it is perfectly tight.
Stick the joints between 2 panels with adhesive.
Again, smooth down carefully to ensure the membrane is watertight.
Cut the membrane at the point where the electric conduit exits and seal it carefully with the adhesive tape.
Join the junction between the membrane and the wall with mastic sealant, and between this and the ceiling and the floor.
Make sure the joint is smooth.
With the insulation roll and the airtight membrane, your wall is now perfectly insulated from the inside.
You can then cover with plasterboard, if you wish.
How to insulate internal walls
Required skills
Taking measurements
Using a spirit level
Picking the right fixings and screws
Using a drill
Using a cordless screwdriver
Using a grinder
Assembling
Using hand tools like hammers, utility blades, snips, etc.
Being in good shape
Being able to work bent over
Working on a ladder
Required time
1 day minimum, depending on the area to be insulated.
Number of people required
2 people
Tools and equipment
Insulation roll
Airtight membrane
Double-sided adhesive
Adhesive tape
Furring channels
Fixing rods
Hammer-in fixings
Screws
Mastic sealant
Caulking gun
Tape measure
Pencil
Chalk lines
Utility knife
Mineral wool knife
Spirit level
Straight edge
Cutting pliers
Hammer
Screwdriver
Drill
Electric screwdriver
Grinder
Personal protective equipment
Long-sleeved clothing
Face mask
Please note: this is a non-exhaustive list; be sure to match your personal protective equipment to the job at hand.
Personal protective equipment
Insulating internal walls and energy efficiency
Like water heating systems, ventilation and other heating systems, insulating internal walls is part of a wider process to make your home more energy effficient and reduce energy consumption and greenhouse gas emissions from buildings.
You may be also interested in these guides
Guide written by:
Patrick, Handyman, Bath
There’s nothing I like quite as much as being in the weekend workshop with my mates. Everyone benefits from their experience. But that’s part of the charm of DIY, helping each other and completing a project. So, if I can help you, it would be a pleasure.