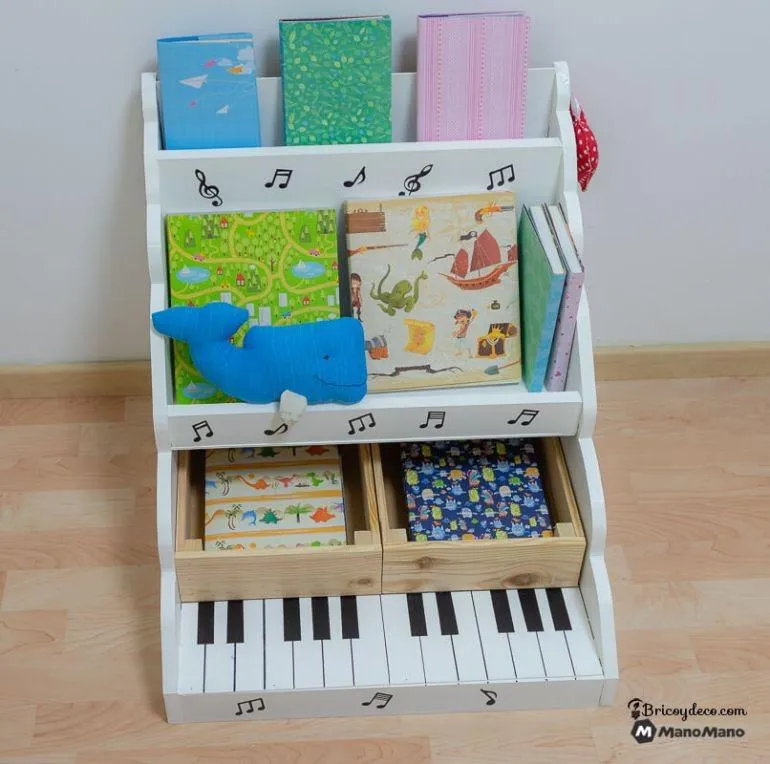
How to make a Montessori method bookcase
'/%3E%3C/svg%3E)
Guide written on 18 September 2026 by:
Mariluz, Blog writer for Bricoydeco
Tools and materials
Jigsaw
Sanding machine
Drill and cordless screwdriver
Nailer
Mitre box
Screws
Painter's tape
1 strip of pinewood measuring 1000x22x22 mm and 1 pinewood board measuring 2400x900x10 mm
1 MDF board measuring 1200x600x19 mm and 2 MDF boards measuring 1200x600x3 mm
Clamps
Carpenter's glue
Water-based varnish
Brush
Cost, time and difficulty
If you already have the necessary tools, the total cost of materials is less than 50€. Considering that this type of bookcases can cost anything between 70€ and 170€, you could save a significant amount of money! And what's more, since you are building it yourself, you will be able to adapt the bookcase to the dimensions and decoration of your children's room.
The level of difficulty is medium, as it requires some experience using some of the tools, like for example the jigsaw. It is for this reason the perfect project for DIY-ers already used to small projects.
It has taken us about 8 hours to finish this Montessori method bookcase, but keep in mind that a significant amount of this time was spent painting and decorating it.
How to make your Montessori method bookcase step by step
Montessori furniture is tailored to the children's height, to make sure that they can reach everything without anybody's help. This allows for the healthy development of their curiosity and independence.
This Montessori method bookcase will not only make for a wonderful reading corner to encourage your children’s love of reading from a small age, it will also play an integral role in their playtime. In order to achieve this, we have painted piano keys on the front of the bookcase, as well as various musical notes all over it. The bookcase not only helps organise the child's storybooks, it will also stimulate their senses.
You can easily build a DIY Montessori bookcase like the one in this tutorial by following these steps:
1. Cut the pieces
First we cut the MDF or DM board, with which we will build the bookcase structure. Cut the following pieces with the jigsaw:
2 triangles measuring 50 cm on each side and 1,9 cm thick, which will make up the bookcase's sides. In addition to this, cut one side of each triangle – the diagonal sides of the bookcase – in the shape of waves
6 strips measuring 50x6x1.9 cm to join the sides of the bookcase together. These will be attached at the base and at the height of each shelf
1 backboard measuring 50x50x0.3 cm, 1 backboard measuring 50x30x0.3 cm and 1 backboard measuring 50x8x0.3 cm for each shelf
1 board measuring 50x28x0.3 cm and 1 board measuring 50x12x0.3 cm for the back of the middle and the top shelves
We recommend that you sand the wave patterns that you have cut with the jigsaw in order to have uniform and smooth edges.
2. How to assemble the bookcase structure
In the following step we will assemble the bookcase structure. First join with screws the strips measuring 6 cm in height to the sides of the bookcase in order to create three different levels.
Next nail the 0,3 cm thick backboards at each level, such that:
the 50 cm deep backboard is nailed to the strips at the base of the bookcase
the 30 cm deep backboard is nailed to the bottom part of the middle shelf, which is at a height of 24 cm
the 8 cm deep backboard is nailed to the bottom part of the top shelf, which is at a height of 44 cm
Lastly, the 28 cm tall panel is joined with carpenter's glue to the back part of the middle shelf – its bottom part will stand on 3 square strips measuring 8 cm long. The 12 cm tall panel is then glued to the top shelf.
3. Painting and decorating your Montessori method bookcase
Next we will paint and decorate this Montessori method bookcase. For this tutorial we have chosen a white water-based varnish to paint the bookcase structure and a black varnish for the decorative motifs.
We have aimed to integrate the idea of play into the decoration, and so we have painted piano keys on the front, and various musical notes all over the bookcase. The idea is to stimulate our children's senses and their creativity.
We have used painter's tape and a permanent marker to paint the piano keys. You can use stencils for the musical notes.
We recommend that you use eco-friendly paints, free of toxic ingredients, in order to reduce the risk of your children developing chemical sensitivity.
4. How to build the drawers
In the last step we will build the drawers which will rest on the bottom shelf of the bookcase. With these drawers the child will easily access all parts of the bookcase. These are the steps we will follow:
Cut 4 wooden boards measuring 25x9x1 cm each and another 4 measuring 35x9x1 cm each, as well as 8 strips measuring 9x2.2x2.2 cm, with the help of the saw and the mitre box
Glue the strips to each of the corners that will make up the drawer
Secure the joining points with the nailer
Cut and attach the MDF backboard measuring 35x25x0.3 cm
After following these steps, all that is left to do is to insert the drawers and our bookcase will be ready.
We can also encourage the child to be part of making their own reading corner, by having them organise the storybooks themselves.
This bookcase will clearly not only help nurture their love of reading, but it will also stimulate your children's fun and play thanks to its piano shape.
You may be also interested in these guides
Guide written by:
Mariluz, Blog writer for Bricoydeco
This article was written by: Bricoydeco and translated. Mari Luz authors the blog ‘Bricoydeco’, she is a DIY fanatic, lover of recycling and customising furniture. Her passion is giving a second chance to turn once forgotten things into unique pieces!
'/%3E%3C/svg%3E)