DIY Advent Calendar
'/%3E%3C/svg%3E)
Guide written on 6 February 2024 by:
ManoMano Team,
MATERIALS NEEDED TO MAKE A DIY ADVENT CALENDAR
For this DIY advent calendar you will need:
A tool board (here a perforated hardboard panel, easier to paint, 60 x 90 cm)
24 hooks to fit your wall panel
24 sheets of paper and something to decorate them with: paint, felt-tip pens, etc.
a glue stick
a pair of scissors
small clips or paper clips
6 screws 50cm, 6 washers, 6 fixings for the board
HOW TO MAKE YOUR ADVENT CALENDAR
STEP 1: PAINT TIME
Paint the panel
Simply apply two coats of paint (using the colour of your choice) with a roller.
STEP 2: FIX THE PANEL
Locate the desired position for the panel and mark the locations of the fixings: at the 4 corners and in the middle of the longest length.
Drill holes to fit the correct fixings to your wall.
Fix by inserting the dividers between the wall and the panel and adding a washer between the screw head and the panel.
STEP 3: PREPARE YOUR ADVENT CALENDAR DOORS
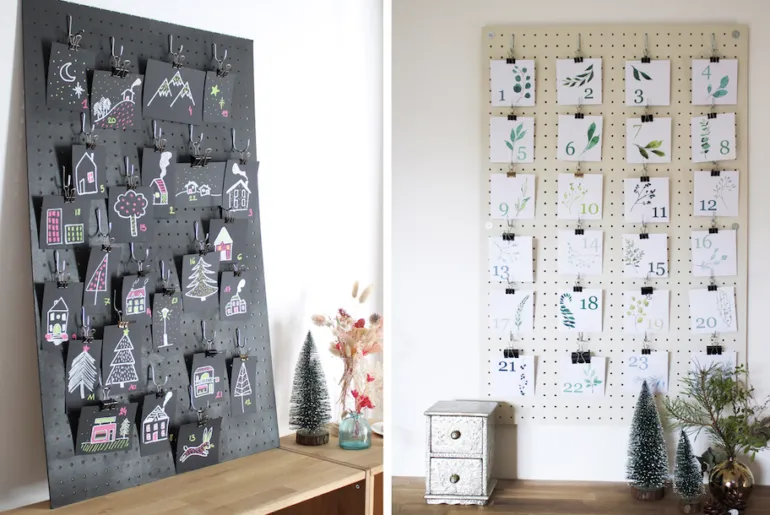
Design a template for each door; an example of the template used for this article can be seen above. You can use paper, card, cardboard – whatever takes your fancy! Then glue the back and sides of the door so it creates an envelope to put the surprises in.
STEP 4: DECORATION STATION
You can draw, create winter motifs or paint: it’s up to you! For the envelope of the door, you can add little treats to them – or alternatively, you could write jokes, riddles, or even start a treasure hunt to find the surprise somewhere around the house.
STEP 5: INSERT THE DOORS
Insert the hooks on your panel and fix the doors with a clip. You can either arrange them in a regular pattern or arrange them randomly as in our black model.
You may be also interested in these guides
Guide written by:
ManoMano Team,
ManoMano is the largest marketplace for products and services in the DIY, gardening and home improvement sector in Europe. Together, we are free to invent a sustainable future and committed to build it today. We are hands-on to improve our homes for tomorrow. Bold, from idea to action. Ingenious always & together. Responsible for people & our planet.
'/%3E%3C/svg%3E)