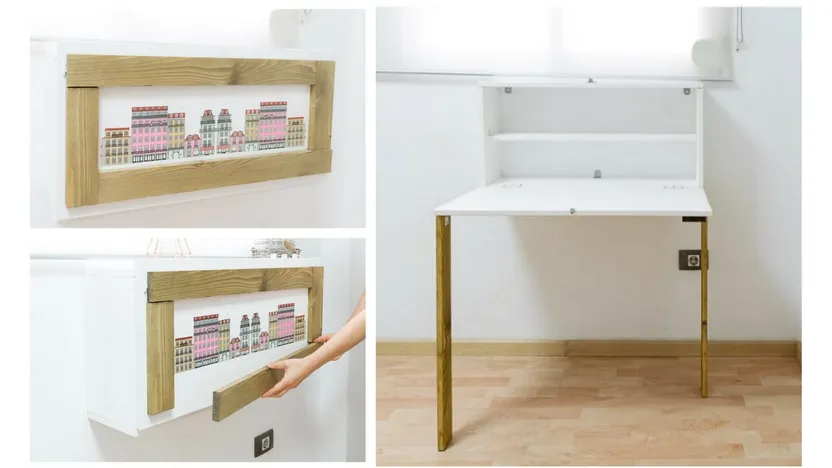
DIY Framed Picture Folding Desk - Furniture for Small Spaces
'/%3E%3C/svg%3E)
Guide written on 18 September 2026 by:
Mariluz, Blog writer for Bricoydeco
Tools and materials
To make this practical desk you will need the following tools
You will also need the following materials:
Wooden panel 18 x 600 x 2200 mm
Spray paint - white satin-finish
Interior wood varnish
Cost, time and difficulty
The approximate price of the materials is less than £70.
This project is ideal for all you handymen - and women! - who have already tried out a few DIY jobs and want to take your skills to the next level. To complete it you will need a full day's work, although this will vary depending on your skills and experience.
Measurements and plan
This desk is made up of a fold-away structure and a door that forms the table top. The outer surface of the door features a picture frame made up of 2 fold-out legs and two fixed side panels. The following image indicates the measurements of each piece of wood required for the project.
Step-by-step DIY folding desk
This folding desk’s main advantage is that it only sticks out 20cm from the wall when folded away. Thanks to its slimline look, you can have a work space no matter how small your room. To make one for yourself, just follow the instructions below:
Step 1: Cut the parts
First, cut the pieces for the structure and door with a circular saw. To do so place the wooden panel on your workbench and secure it using clamps. You can use the guideline measurements we suggest or adapt these to your needs.
For the table legs and the side strips which make up the picture frame on the door, use the mitre saw to cut your wood to the right size. Being fairly narrow (7 cm), this will be easier than using the circular saw.
Step 2: Put the desk frame together
The next step is where you will have to put together the different parts of the structure. To help you, use the mounting brackets to join the upper and lower planks (80 x 20cm), to the side pieces (36.4 x 20cm). Finally, attach the 76 .4 x 15cm plank in the centre, to serve as a shelf. This also makes the framework sturdier.
Step 3: Paint the structure and door
Next paint the pieces. In our example we have painted the frame and the door in white satin-finish acrylic spray paint. For the picture frame formed by the table legs, we have used an oak-tinted varnish which accentuates the grain. The combination of paint and varnish also gives a lovely decorative contrast.
Step 4: Assemble the legs
Once the paint and varnish have dried, you can assemble the legs on the panel which will serve as the door. To do so, nail the two side strips (26 × 7cm) as follows:
Place both strips at a distance of 2cm from the sides.
The left-hand strip should be 10cm from the top edge and 3cm from the bottom.
The right-hand strip is the opposite, i.e. 3cm from the top edge and 10cm from the bottom.
Place the table legs one on each side, keeping a distance of 2cm from the edge, and screw them to the hinges.
When it comes to attaching the strips of wood, remember that they should be as flush as possible. This way when the door is shut, the legs will stay folded away thanks to the pressure exerted by the side strips.
Step 5: Decorate the door
We have decorated the door with decorative napkins using decoupage. Adding an interesting image here means that, when the desk is folded away, it looks great because it gives the appearance of a framed picture.
Step 6: Assemble the folding door
Next, screw in the hinges for the folding door and bolt it to ensure the door stays closed when the table is vertical (folded away). Attach a hinge at each end, and place the bolt at the centre.
Step 7: Attach to the wall
Finally, attach the whole structure to the wall using mounting brackets. Before you drill into the wall, check first that the legs reach the ground when unfolded. To make the structure easier to drill, place it on an adjustable sawhorse or stand.
Desk, storage and attractive picture frame...3 in 1!
In our case, we wanted to position the folding desk below a window, as this will provide the area with natural light. Because it is painted white, just like the wall, the desk takes up very little space visually. The wooden table legs and decorative motif simulate a framed picture when the desk is closed.
When the legs are unfolded, the desk’s interior offers a practical storage space. The table's size is also perfect for carrying out small craft projects or for use as an office desk.
You may be also interested in these guides
Guide written by:
Mariluz, Blog writer for Bricoydeco
This article was written by: Bricoydeco and translated. Mari Luz authors the blog ‘Bricoydeco’, she is a DIY fanatic, lover of recycling and customising furniture. Her passion is giving a second chance to turn once forgotten things into unique pieces!
'/%3E%3C/svg%3E)