Easy pallet projects: DIY outdoor tool storage
'/%3E%3C/svg%3E)
Guide written on 6 February 2024 by:
Bricoydeco
Tools and Materials
Most easy pallet projects, including this one, need these tools and materials:
Orbital sander
Mitre saw or hand saw and mitre box
Drill/ screwdriver
A pallet and 3 extra pallet boards (read about how to get them for free here)
Wood screws
Wall hooks
Varnish
Brush
Cost, Time and Difficulty
It will only cost you around £20 to keep all of your tools and implements organised, as long as you already have the tools required.
A morning should be enough time to complete this DIY project. However, keep in mind that depending on the protective coating you use for the wood, this completion time will vary according to the drying instructions.
The difficulty level for this project is low. In fact, this is the ideal project for anyone starting out on their first DIY pallet project, which is why we've listed it under easy pallet projects ;)
Easy Pallet Projects: DIY Outdoor Tool Storage
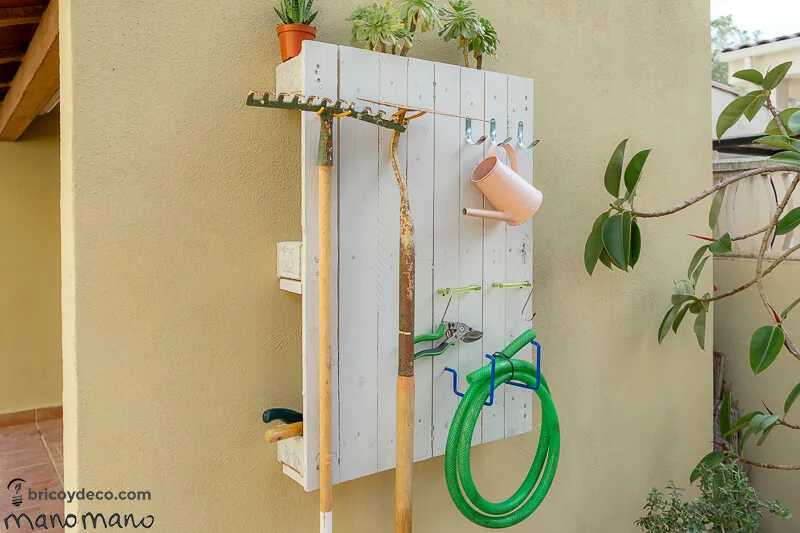
This pallet organiser features an extra storage space at the back. Therefore, the top section has been used as a planter while the central and bottom sections are for storing garden tools.
Step 1: Sand the pallet
The first step is to sand the pallet with an orbital sander, both the top and back. Also sand the 3 extra boards – which you can take from another pallet.
If the pallet is in very bad condition, we recommend starting with a coarse grain paper to remove splinters and flaws. Next, give it a once over with a medium grain sand paper. This will give the pallet a more uniform, smooth finish.
Step 2: Cut and drill the extra boards
In order to increase the storage spaces on the pallet, we've screwed in some extra pallet boards at the back. To do this, follow these steps:
Cut the boards to the width of the pallet. You can use either a mitre saw or a hacksaw.
Screw the boards on to the back of each crossbeam on the base of the pallet.
This will create 3 spaces on the back which can be used to store small tools and implements, or even as a planter.
Step 3: Protect and decorate the pallet
The next step is to protect and decorate the pallet with varnish. Varnish penetrates the wood and protects it, but as an open-pore coating, it also allows the wood to breathe and can help regulate the internal moisture. That's why it's ideal for protecting any wood to be used outdoors.
When applying varnish, you will need a minimum of two coats to allow the product to penetrate the wood fully and properly protect it.
Varnish is also available in a variety of colours and shades, meaning it is decorative as well as protective. In our case, we chose a white colour.
Step 4: Attach hooks
The last step is to attach several hooks to the pallet to be able to hang your tools. Specifically, we used:
Hooks to hang the hose
U-shaped mounts to hold a spade and rake
Various coat hooks
Handles to hang S-shaped hooks from
Meanwhile, it's a good idea to use plastic or stainless steel hooks and mounts to provide protection against outdoor weather conditions.
Once you've completed these steps, all you need to do is drill some holes in the wall to hang your organiser pallet and start organising your garden tools and implements, keeping them nice and handy.
You may be also interested in these guides
Guide written by:
Bricoydeco
This article was written by: Bricoydeco and translated. Mari Luz authors the blog ‘Bricoydeco’, she is a DIY fanatic, lover of recycling and customising furniture. Her passion is giving a second chance to turn once forgotten things into unique pieces!