How to fit a wall hung basin
'/%3E%3C/svg%3E)
Guide written on 6 February 2024 by:
Jeremy, Construction site supervisor, Cardiff
Important features
- Preparation
- Fitting angle stops
- Securing the basin
- Sealing
Wash basins: a bathroom essential
From pedestal sinks to wall-mounted models, basins come in all designs and a range of colours. One of the most important sanitary appliances in any bathroom, a basin should be installed carefully and with precision. Bathroom basins must be fitted securely, the water feed must be connected correctly and the waste hooked up with care to avoid any risk of leaks.
Steps
Prepare to install the basin: new bathrooms vs. renovations
Fit the angle stops
Fit and secure the wall hung basin
Sealing the basin and finishing touches
1. Prepare to install the basin: new bathroom vs. renovation
As is often the case, the key to success is to prepare your work space properly.
No matter the installation set-up, the first thing you'll need to do is to cut off the water supply before you set about disassembling anything.
Replacing an old basin
If the aim is to replace an old wash basin, you should proceed as follows.
Remove the waste (the trap and plug)
Remove the basin taps
Remove the angle stops
Unscrew the wall fixings and the pedestal (if required) and remove the old sink
At this stage, only the water pipes, threaded rods (if you are removing a wall-mounted basin) and waste pipe should be in place.
Installing a new basin
In this case, there's nothing to disassemble. However, you do need to ensure that everything is in place for the new basin.
You should have two water feeds in front of you. These pipes may be made of copper or you may have PEX pipes. The pipes should feature a male threaded connection.
Installing a compression fitting
If this is not the case, add two compression fittings to which you can connect your angle stops and/or flexi hoses.
You should also check that the waste outlet is in position in the wall. This is usually a PVC pipe.
Threaded rods
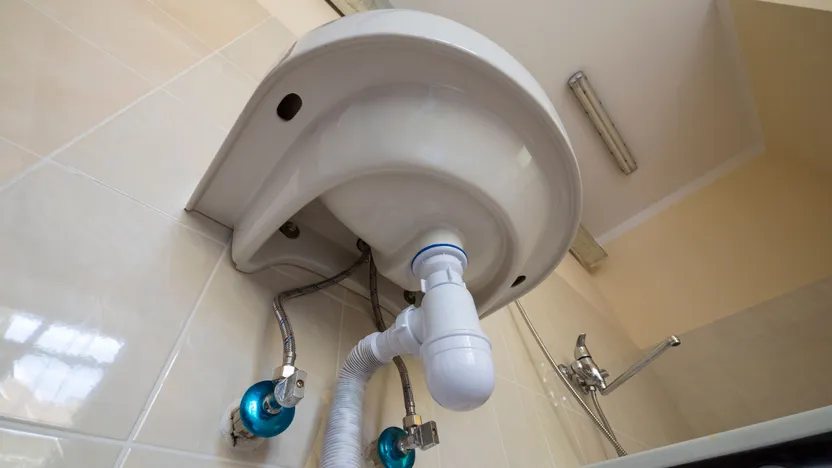
2. Fit the angle stops
To connect the basin taps to the water feed, you will have to create a compatible set-up for your flexi hoses. When working with a wall-mounted basin, the hardware that allows you to do so is an angle stop valve.
As the name suggests, these valves are angled to 90°. This makes it possible to fit your flexi hoses vertically.
You will often need an extra fitting to install angle stops. This component is connected to the water pipes sticking out of the wall and should be chosen to match the size of the fittings you want to use.
Apply PTFE tape or pipe sealing cord to the angle stop to make the connection watertight and screw everything into place on the water pipes.
You can then screw on the angle stop.
Use a box spanner or an adjustable spanner to tighten all parts.
Follow the same process for both angle stops and close the valves. To ensure that there are no leaks you can turn the water supply back on and look for signs of leaks.
Adjustable spanners
3. Fit and secure the wall hung basin
Wall mounting a basin
In most cases, wall hung basins are installed using threaded rods which come supplied with the basin.
If you are replacing an existing basin, check that the space between these rods is compatible with the new basin.
If you are installing a new basin, use the template provided to mark out and drill your holes. Alternatively, if the basin comes supplied with a sound deadening panel, you can use this to mark out the gap. Insert the wall plugs and secure the rods. After you have inserted the threaded rods and soundproofing panel, measure the length of the rods sticking out of the wall and compare the measurement with the base of the sink.
Next, secure the basin using the following method:
Trim the threaded rods if required.
Fit the basin to the threaded rods.
Fit the washers and nuts.
Tighten fully.
Check that the basin is level using a spirit level.
Cut the sound deadening panel to size by scoring around the contours of the basin with a utility knife.
Connecting the waste
The waste system of a sink is made up of a waste plug and trap.
Start by fitting the waste. Don't forget to put the seals into position before screwing the waste through the basin plug hole. Use a box spanner or basin wrench to tighten.
Start assembling the trap by screwing the trap to the waste in the sink. You should tighten these parts by hand.
Measure the length of the trap compared to the waste pipe coming out of the wall. Cut the trap according to these measurements.
Line up the trap and waste pipe without securing anything. If everything aligns properly, connect all parts taking care to fit the O rings and seals in the correct order. Tighten firmly by hand.
Check that the trap is watertight by pouring water into the wash basin.
O rings
4. Sealing the basin and finishing touches
To finish off your wash basin, you will have to lay a silicone seal around the edges of the basin.
This silicone will provide a watertight seal between the wall and the basin and limit mould growth and dirt build-up.
Use a sealant gun and the silicone cartridge of your choice (transparent, white, grey, anti-mould, etc).
If you have experience applying silicone, apply the sealant directly taking care to cover the entire surface where the basin meets the wall.
If you are not very skilled in applying sealant, start by placing tape on each side of the gap, both on the wall and on the sink, leaving a gap of about 1 cm (5mm on each side). Lay a silicone bead using the sealant gun and smooth down the seal using a finger dipped regularly in soapy water. Remove the tape once you're done.
Adhesive tape
How to fit a wall hung basin
Required skills
In order to correctly fit a wash basin and connect it to the water pipes and waste pipe you will need to master a few plumbing basics. This means knowing how to secure fittings, assemble seals and assemble various parts.
In terms of actually securing the basin, you will need to know how to use a hammer drill and be able to choose the right wall plugs and screws to use. You will also have to be able to apply silicone sealant.
Time required
Approx. 2 hours 30 mins
Number of people required
1 person
Tools and equipment
Wash basin
Waste kit (waste plug and trap)
Two angle stops
A silicone cartridge and sealant gun
PTFE tape or pipe sealing cord
A set of open-ended spanners
An adjustable spanner
A box spanner or hex screwdriver
One or several slotted screwdrivers
A hacksaw
A hammer drill with drill bits
A spirit level
A utility knife
Safety and workwear
Please note: this is a non-exhaustive list; be sure to match your personal protective equipment to the job at hand.
Utility knives
You may be also interested in these guides
Guide written by:
Jeremy, Construction site supervisor, Cardiff
Electrician by trade, I first worked in industrial estates where I installed, wired and fixed a large number of electrical installations. After this, I managed a team of electricians for this type of work. 10 years or so ago, I turned to building and construction. From the modest family home, to gyms and theatres, I have been able to coordinate, audit and organise all sorts of construction sites. For 4 years now, I am restoring and building an extension to a bungalow in the heart of the Welsh countryside. My experience in manual work and my knowledge means I am proud to be of service. Terraces, interior design, roofing, plumbing, electrics, anything goes! My wife, daughter and I, built almost everything we have from scratch! So to answer all of your questions and advise you on choosing your tools? Easy!