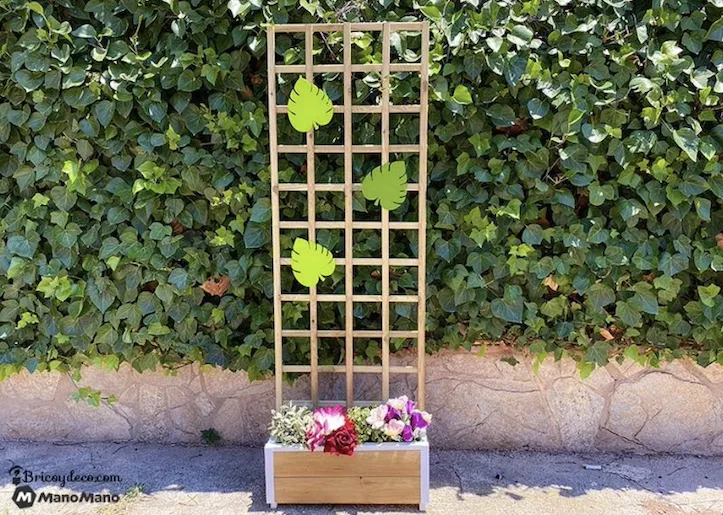
Outdoor Privacy Screen: DIY in 5 clever steps
'/%3E%3C/svg%3E)
Guide written on 6 February 2024 by:
Bricoydeco
Outdoor privacy screen: Tools and Materials
Mitre saw and/or mitre box and hand saw
2 pine wood boards measuring 200 x 10 x 1 cm, 2 slats measuring 200 x 3.4 x 2.2 cm and 1 plywood board measuring 60 x 30 x 0.5 cm
PVC angle profile measuring 200 x 3 x 3 cm
Paint brushes
Cost, time and difficulty
If you have all the necessary tools, the total cost of materials is about £40, depending on the size of the trellis or privacy screen.
It will only take you one morning or afternoon to build this planter with trellis. The level of difficulty is low, as it only requires some DIY practice. It is, for this very reason, the perfect DIY project for beginners or those with little DIY experience.
Build an outdoor privacy screen step by step
The main advantage of this trellis planter as a privacy screen is the fact that the wood has been pre-treated to be used both indoors and outdoors.
In addition, it is not very heavy, making it easy to move, although if you prefer, you can attach castor wheels to move it even more easily. Another idea is to put a few of these trellis planters in a row in order to divide a large space in an elegant way. Here is the step by step guide to build this wooden trellis planter.
Step 1 - Cut the pieces
First, cut the pine wood boards and slats, either with the mitre saw or with the hand saw and mitre box. These are the different pieces you will need:
To begin, cut the pieces
4 boards measuring 60 x 10 x 1 cm and 4 boards measuring 20 x 10 x 1 for the planter
1 piece of plywood measuring 60 x 20 x 0.5 cm
4 slats measuring 25 x 3.4 x 2.2 cm for the planter's legs, 2 slats measuring 60 x 3.4, x 2.2 cm and another 2 measuring 16 x 3.4 x 2.2 cm for the top part of the planter
Step 2 - Assemble the pieces of the planter
Next, assemble the pieces that make up the planter. In order to do this, follow these steps:
Bring the pieces together
Glue the 25 cm long strips that make up the legs.
Nail two 20 cm long wooden boards to one side of the legs and another two 60 cm long boards to the other side.
Nail the plywood board measuring 60 x 20 cm to the bottom.
Step 3 - Protect the wood
Protect the wood
The next step will be to protect and stain the wood. This type of finish is ideal for terrace and outdoor furniture, as it allows the wood to breathe as well as regulate its moisture. This prevents it from cracking due to the contraction and expansion movements typical of this material.
For this tutorial we have used a wood stain with a slight green hue that highlights the wood's grain, and is close to the colour of the trellis that will be attached to the planter.
Step 4 - Apply the finishing touches to the edges
Next, you will need to apply the finishing touches to the top and bottom edges of the planter. In order to do this, glue the slats measuring 60 cm and 16 cm long, and then fix them with the nailer.
The finishing touches
Then apply a water-based wood varnish suitable for the outdoors, and fix the PVC angle profiles measuring 25 cm long to the corners or edges.
Step 5 - Attach the trellis
The last step will be to screw the trellis to the back of the planter. For this tutorial we have chosen a wooden trellis measuring 180 x 60 cm, made of pine wood previously treated with autoclave in order to make it suitable for the outdoors.
Add the trellis to the wooden planter
Another option would be to build your own trellis by nailing the wooden slats and then protecting the wood with wood stain.
The last thing you need to do is just add a few plants and ornaments to decorate the trellis planter.
Add some greenery to the wooden trellis planter
Its versatility will allow you to place it in any indoor or outdoor space to suit your particular needs.
Voilà! An outdoor privacy screen
You may be also interested in these guides
Guide written by:
Bricoydeco
This article was written by: Bricoydeco and translated. Mari Luz authors the blog ‘Bricoydeco’, she is a DIY fanatic, lover of recycling and customising furniture. Her passion is giving a second chance to turn once forgotten things into unique pieces!
'/%3E%3C/svg%3E)