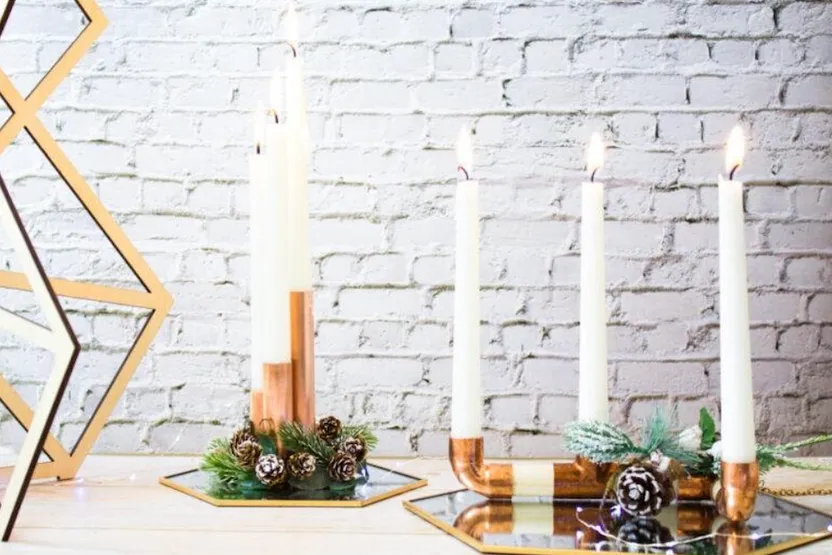
DIY candle holders: tutorial to brighten up your home
'/%3E%3C/svg%3E)
Guide written on 6 February 2024 by:
ManoMano
What you’ll need to make your DIY candle holders
For your copper candle holders, you’ll need:
copper tube 22mm (you can also use 22mm wooden dowels if necessary)
female copper pipe fitting 22mm, such as 90° pipe elbow or equal tee, depending on the desired shape for your candle holders
a pipe cutter, which is a small and affordable tool that ensures pipe cuts are clean and precise
steel wool (ideal for sanding copper to get a nice copper-pink finish)
a ruler
a pencil
Epoxy glue
How to make your own DIY candle holders
We’ve provided three models for your DIY candle holders:
the first one is very simple and consists only of 3 copper pipes cut to different heights
the second one uses fittings to create a 3-branch candle holder
for the third, we’ve replaced the copper pipes with wooden dowels and changed the shape of the structure by adjusting the direction and sequence of the fittings.
Experiment with the configuration if you like. For example, you can even link several tee joints together to get a candle table runner.
Cut the copper pipes or wooden dowels
Whichever model you choose, you’ll need to start by cutting the straight sections of your candle holder to size.
First, mark your pipe or dowel to the desired size.
Cut the pipes with a plumber’s pipe cutter.
How to use a pipe cutter
With this tool, you can make perfect circular cuts on your copper pipes. First, loosen the adjustment knob—or another mechanism—on your cutter to insert copper pipe between the cutting blade and the rollers facing it. Tighten the knob—but not so much that you can’t move it later—until the pipe is held in place. Turn the tool around the pipe to make a groove in the metal. Tighten the knob a little with each turn. The groove will deepen until the pipe easily cuts in half.
Once you’ve cut the pipe, use the deburrer on its inside surface for a smooth finish. This step is optional because it’s commonly used for plumbing pipes before they are welded, which is not necessary for this project.
Sand your DIY copper pipes until they shine
Next, use steel wool for sanding your copper pipes. This not only cleans the metal but also polishes it, giving it an appealing copper-pink colour. In the photo above, you can see the sanded pipe on the left, which is much lighter than the raw pipe on the right. To ensure the colour keeps its hue, add a thin coat of metal varnish.
Assemble the copper pipes and fittings to create the main structure for your DIY candle holders.
For model 1 (single candle holder with three pipes), you only need three pipes (6, 9 and 13 cm, respectively).
Before gluing, insert the candles into each pipe. Force the candle in the opening if necessary and turn it to shape the wax for the holder.
Now remove the candles so you can glue the pipes together. Ensure the end of each pipe sits flat on the table. For this version, we’ve chosen to assemble three pipes, but you can easily create a larger model by multiplying the pieces of copper pipe you use.
How to choose your glue
You can use 2-part epoxy glue to bond the metal. In this case, choose a quick-drying glue that normally works after minutes. If you don’t use quick-drying glue, you will end up holding the structure in place while it dries.
You can also use hot melted glue sticks with a glue gun for quick bonding. Wear gloves to protect your hands from burns.
Once the structure is dry, put the candles back in their holders.
For model 2, you’ll be making a candle holder with three branches. For this one, you’ll need pieces of copper pipe—here, we used 7cm—plus three female 90° elbow fittings and a female tee connector.
Start by gluing the pipes into each part of your tee fitting.
Next, glue an elbow fitting, facing up, to each free end of the copper pipe.
The tee joints can be linked together in a staggered pattern to create a “table runner” style candle holder with multiple branches.
To hold the candles in place, pour a little melted wax inside the fitting to keep it straight.
For model 3, we replaced the copper pipes with wooden dowels of the same diameter. We also used three 90° elbow fittings and a tee fitting, but in a different configuration.
Connect the fittings and wooden dowels
If you want to extend your candle holder or change the zig-zag configuration, you can simply rotate the last bend to add a wooden dowel. Then, you can add as many fittings and candles as you like!
Repeat the step used in model 2 to insert your candles into their holders.
You may be also interested in these guides
Guide written by:
ManoMano
ManoMano is the largest marketplace for products and services in the DIY, gardening and home improvement sector in Europe. Together, we are free to invent a sustainable future and committed to build it today. We are hands-on to improve our homes for tomorrow. Bold, from idea to action. Ingenious always & together. Responsible for people & our planet.
'/%3E%3C/svg%3E)