How to repair leaks in copper pipe
'/%3E%3C/svg%3E)
Guide written on 6 February 2024 by:
Jeremy, Construction site supervisor, Cardiff
Important features
- Identify the location of the leak
- Turn off the water and prepare the copper pipe
- Patch up the leak
- Stop the leak using new copper pipe and compression fittings
- Turn the water back on and check for leaks
Repairing a copper pipe leak without calling in a plumber
A leaking pipe puts your home at risk of water damage. But in order to repair the pipe in question you need to have the right equipment on hand and know how to solder – and that's certainly not the case for everyone! That said, you don't have to be a plumber to temporarily patch up a leaking pipe. In fact, most of the repairs set out in this guide should be used as quick fixes and not as long-term solutions. Here are three quick ways to deal with a leaking copper pipe:
Patch up the leak with epoxy putty
Patch up the leak with rubber and a hose clamp
Replace the section of leaking pipe
Patch up the leak with epoxy putty
The first solution involves using an epoxy putty. This putty is sold in kits made up of two pastes which look a bit like modelling clay. When mixed together, these pastes turn into a quick-setting hard putty that can be used for repairs. Epoxy putty is ideal for patching up a leak in a hurry.
This method works well for leaks in hard-to-reach spots where it would be tricky to insert a pipe repair clamp (for example, the inside of an elbow or around a tee). The resin is able to mould perfectly to any shape.
Patch up the leak using rubber and a hose clamp
The second solution involves using a piece of flexible plastic, or ideally rubber, to cover the spot that is leaking and clamping it in place using a hose clamp. A piece of garden hose can be used as the rubber for this fix.
This method is best used for more urgent situations. For example, if you have a leaking pipe and are unable to turn off the water to carry out repairs, you should be able to put the hose clamp in place even if water is still running. Conversely, if you try to use epoxy putty where there is water, you will have issues getting the putty to stick and harden. You can also use a pipe repair clamp, should you have one to hand.
Replace the section of leaking pipe
The third option involves replacing the section of copper pipe that is leaking with a new length of pipe and some compression fittings (which do not require soldering). This solution is a little more complex and the process is longer, but it does provide more reliable and long-lasting results. Replacing a section of copper pipe can only be done if you have easy access to the copper pipe, have basic DIY skills and are able to turn off the water.
Steps
Identify the location of the leak
Turn off the water and prepare the copper pipe
Patch up the leak OR
Stop the leak using new copper pipe and compression fittings
Turn the water back on and check for leaks
Resin
1. Identify the location of the leak
Before you turn off the water, it's a good idea to find the exact location of the leak. But be careful – water can stream along the pipe and may drip in a different spot to where the pipe is actually leaking. A good foolproof tip used by plumbers to detect leaks and pinholes involves putting your finger in dust or chalk and passing it along the length of the copper pipe:
if the dust stays on the pipe, there is no leak;
if the dust is replaced by water, you've managed to track down the leak.
2. Turn off the water and prepare the copper pipe
Turn off the isolating valve that supplies the pipe you need to repair.
Drain the remaining water in the pipe. You don't need to drain the system in full. You simply need to reduce the pressure so that water doesn't run while you carry out your repairs.
Use a wire brush to clean the section of the copper pipe where you have located the leak or skip straight to section four if you have to replace the copper pipe.
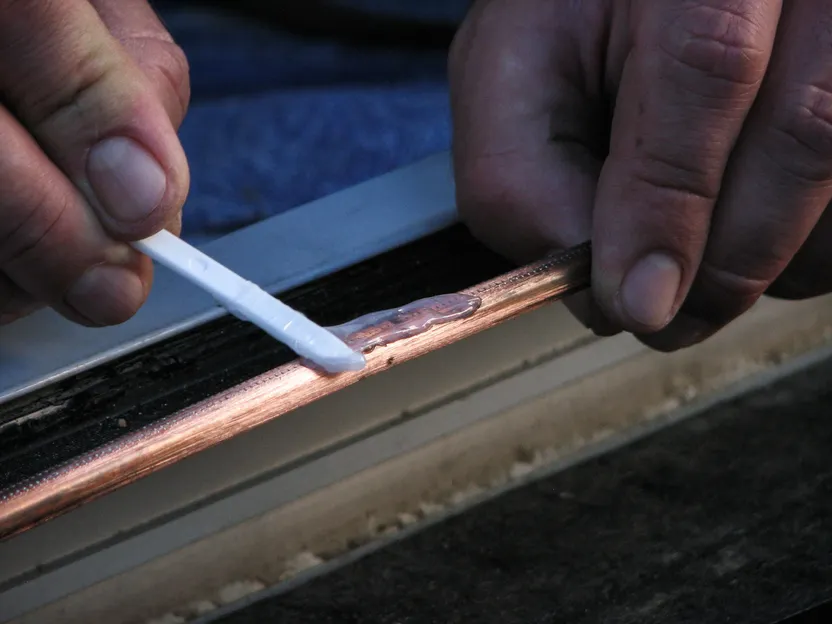
3. Patch up the leak
Repairing a leak using rubber
Cut a small piece of rubber or flexible plastic and position it over the leak.
Cover up the rubber using a hose clip clamping it firmly in place on the pipe using a screwdriver. Depending on the size of the leak and where it is located, you can add a second clip if necessary. Bear in mind you can also use a pipe repair clamp designed specifically for this purpose.
Wipe down the area with a cloth.
Repairing a leak with epoxy putty
Cut a piece of each of the pastes provided and mix the two together until you get an even colour. Roll out the mixture between your hands and apply a cord around the damaged part of the pipe.
Smooth out the putty to ensure it is bonded well to the surface.
Leave the product to cure according to the instructions.
4. Repair the leak using new copper pipe and compression fittings
Replacing a section of pipe offers a more durable solution, but can only be done if you turn off the water supply first.
Turn off the water at the isolating valve or mains.
Drain the system by turning on a tap.
Cut a section of copper pipe directly around the leak if it is small or remove about 10cm on each side if you are dealing with a larger leak.
Once you've identified the section of copper pipe you need to replace, grab one or two compression fittings and a length of copper pipe.
Dealing with small leaks
Cut out a section of around one centimetre from the copper pipe and use an emery cloth to rub the copper pipe where you have made your cut. Next, install the compression fitting and secure it firmly using a spanner.
Dealing with larger leaks
Fit a compression fitting onto the copper pipe and mark out the depth where it sits on the pipe.
Remove the fitting and measure the length required to install the fitting.
Multiply this number by two and subtract the total from the new length of pipe you are going to be fitting.
Mark out your measurements on the new copper pipe and cut the pipe to size using a hacksaw.
Use an emery cloth to clean off the ends of the pipe (both the new section and the existing pipe). The copper pipe must be perfectly smooth and shiny.
Place the compression fittings onto the pipes. If the existing pipe is clamped in place, you can remove it from the brackets to make it easier to fit the new length of pipe with the two fittings.
Tighten the compression fittings using a spanner once everything is assembled.
Secure the fittings on one side then the other.
5. Turn the water back on and check for leaks
Turn the isolating valve slowly to prevent surge pressure.
Check for leaks as described above by passing a dusty finger over the spot you have repaired.
Clean up your workspace and tidy away your equipment.
If all goes well, you have just managed to repair a leaking copper pipe. If you have applied a quick fix using rubber or epoxy putty, you shouldn't see any more drips until the plumber arrives to deal with the issue.
Replacing a section of pipe using compression fittings is a more durable solution and if you have followed the steps correctly, you shouldn't need to call out a plumber.
How to repair leaks in copper pipe
Required skills
No particular skills are required to repair a leaking copper pipe. You will, however, have to be able to use a screwdriver and hose clamp or be prepared to read instructions carefully to mix your epoxy putty. If you are fitting a compression fitting, you'll need to be comfortable using a saw, emery cloth and spanners.
Time required
10 mins to an hour depending on chosen method
Number of people required
1 person
Tools and equipment
Wire brush
Hose clamp
Rubber
Epoxy putty or rubber and hose clamp
Cloths
A set of screwdrivers
Spanners and emery cloth (if replacing pipe)
Copper pipe and compression fittings (if replacing pipe)
Safety and workwear
Overalls
Please note: this is a non-exhaustive list; be sure to match your personal protective equipment to the job at hand.
Hose clamps
You may be also interested in these guides
Guide written by:
Jeremy, Construction site supervisor, Cardiff
Electrician by trade, I first worked in industrial estates where I installed, wired and fixed a large number of electrical installations. After this, I managed a team of electricians for this type of work. 10 years or so ago, I turned to building and construction. From the modest family home, to gyms and theatres, I have been able to coordinate, audit and organise all sorts of construction sites. For 4 years now, I am restoring and building an extension to a bungalow in the heart of the Welsh countryside. My experience in manual work and my knowledge means I am proud to be of service. Terraces, interior design, roofing, plumbing, electrics, anything goes! My wife, daughter and I, built almost everything we have from scratch! So to answer all of your questions and advise you on choosing your tools? Easy!