How to use a compression fitting
'/%3E%3C/svg%3E)
Guide written on 6 February 2024 by:
Michael, Professional and passionate welder, Sheffield
Important features
- Prepare to fit the compression fitting
- Prepare the copper pipe
- Fit the olive and set in place
- Tighten the compression fitting
What is a compression fitting?
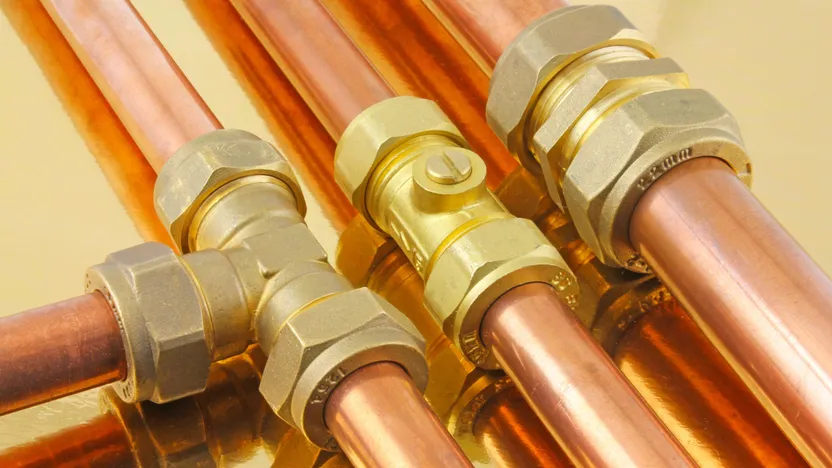
Among some of the most common solutions for joining copper pipework are brass compression fittings. These couplings feature an olive or ferrule which bites into the pipe and eliminates the need for soldering. They are most commonly used to join hard copper pipe which generally comes in lengths of 2 to 5 metres.
Often used as part of renovations for tasks like replacing kitchen taps or bathroom taps, these fittings are reasonably priced and don't require soldering making them ideal for anyone with limited plumbing experience.
Diameters can range from 6 to 22 mm and fitting types include tee, elbow, straight and mixed connectors with male or female threads. Compression fittings are frequently used to connect taps and other sanitary ware and feature a fairly basic design. They have a main body (which corresponds to the diameter of the pipe) and two threaded seats where nuts are screwed on. A compression ring, called a ferrule or olive, is designed to fit between the seat and the nuts, and is deformed upon tightening to create a watertight seal. The olive can therefore only be used once, but it is possible to replace it when removing an old compression fitting.
Please note: this type of plumbing fitting cannot be used for gas connections.
Steps
Prepare to fit the compression fitting
Prepare the copper pipe
Fit the olive and set in place
Tighten the compression fitting
Digital callipers
How to use a compression fitting
1. Prepare to install the compression fitting
At this stage, the rules for installing a solder-free compression fitting are more or less the same as making a soldered joint. If required, mark out the position of the copper pipe on the wall using a tape measure, laser level and straight edge in order to fit pipe clips.
Compression fittings have a seat where the copper tube is partially slotted in. With this in mind, don't forget to account for a loss of a few millimetres when you are cutting the pipe. The copper pipe needs to be correctly inserted into the compression fitting body in order to be absolutely watertight. If you need to be able to remove the pipe later on, you'll need to leave a little space between the pipe and the wall so you can easily access the pipe once the fitting is in place. To achieve this, you can fit your pipe clip with a rosace backplate.
If you are fitting two compression fittings next to each other, you need to leave at least 30 mm between them. Some DIYers like to add PTFE tape to the threaded seat under the nuts. However, this is not entirely necessary as the connection is made watertight by the olive.
2. Prepare the copper pipe
Depending on the type of fitting you are making, your copper pipe can take anywhere from 3 to 15 minutes to prepare.
If you are working on an existing system and you need to bend down under a kitchen sink or bathroom basin to cut the copper pipe using a hacksaw, there's a good chance your prep work will take at least 15 minutes. The same goes if the copper pipe is covered with paint which will need to be removed.
If, on the other hand, you are preparing the pipe on a workbench at a good working height and you have pipe cutters and a deburring tool to hand, you won't need any more five minutes to prepare.
No matter which tools you are working with, or where you are working, you must:
cut the copper pipe with pipe cutters unless you have enough room to manoeuvre a hacksaw;
deburr the copper pipe using a deburring tool (provided you have enough room) or an emery cloth.
If you have not already done so, measure the diameter of the copper pipe using digital callipers to make sure you choose the right fitting. If your pipe is against the wall add a rosace backplate to your pipe clip to ensure you have enough space to tighten the nuts using water pump pliers or an adjustable spanner.
Hacksaws
3. Fit the olive and set in place
The longest part of the process is preparation. When it comes to actually fitting the compression fitting, simply:
slip the nut onto the copper pipe;
fit the olive in front of the nut;
push the pipe into the body of the compression fitting;
tighten the nuts by hand.
4. Tighten the compression fitting
Once the copper pipe is fitted snugly inside the compression fitting, the nuts are in place and you have secured the fitting into the correct position by hand, you can move on to tightening the fitting using the right type of spanner.
To do so, simply:
hold the fitting firmly in place while you tighten the nut using water pump pliers or an open-ended spanner of the correct size;
check that the nut is secure;
test the fitting to check it is watertight.
How to use a compression fitting
Required skills
Any DIYer should be able to secure a compression fitting. However, it's important to stick to the few steps outlined above or you will end up with a leak! Being able to clean a copper pipe using emery cloth and tighten the fitting using a spanner, adjustable spanner or water pump pliers are the main skills involved when installing a compression fitting. Depending on your plumbing system, you may also have to use pipe cutters or a hacksaw.
Time required
15 to 30 mins
Number of people required
1 person
Tools and equipment
Pipe cutters or a hacksaw
Deburring tools or emery cloth
Water pump pliers or adjustable spanner
Safety wear
Plumbing overalls
Please note: this is a non-exhaustive list; be sure to match your personal protective equipment to the job at hand.
Deburring tools
More information on plumbing
How to connect PVC pipe
Brass pipe and fittings
You may be also interested in these guides
Guide written by:
Michael, Professional and passionate welder, Sheffield
I was trained as a pipe worker and a pipe-welder and after having travelled for 35 years working around the UK, I became the head of a metal shop, then a designer and in the end the head engineer. I have designed and built a workshop where I make metal sculptures: I managed to find a piece of paradise where I can let my imagination run wild. Auctions and garage sales are no secret to me. I find unusual objects and old tools there that I collect or transform into works of art. I also like decoration, painting on canvas, and gardening. I am developing new technologies concerning tools. To share my passion and advise you in your choice of materials is a real pleasure.