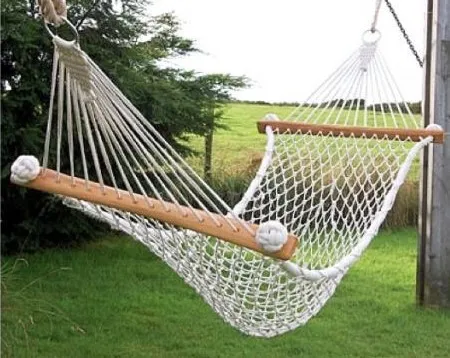
How to make a hammock
'/%3E%3C/svg%3E)
Guide written on 6 February 2024 by:
ManoMano Team,
You will need:
10 x 30m Braided cord or rope. Here, white cord is used, but feel free to experiment with colours and sizes - just make sure the rope’s strong enough to bear the weight!
2 x Metal O-Rings
2 x 1m dowel or wood
How to make a hammock : Step 1
Start by taking one of your ten pieces of cord. Take the two ends and put these together to create a folded piece. Then, taking hold of the other (folded) end, thread this through your o-ring.
Step 2
Take the two end pieces of cord and thread this through the loop you just created. Pull tightly until it is secured on the o-ring.
Step 3
Repeat steps 1 and 2 until all pieces of cord have been looped through the metal ring. Pull the ropes tightly. Tip: once done, we recommend singing the ends of your cord with a lighter to prevent it from fraying!
Step 4
Drill 20 holes evenly across both wooden dowels. Putting the ring above the dowel, start threading each cord through the corresponding hole, taking them in order until every piece of cord is threaded. Tip: hammock keeps moving around? Try hanging the metal ring on something to make this step easier.
Step 5
Tie a secure knot in the rope, just under where you want the dowel to go. Repeat this knot for each cord, trying to keep them in a straight line. This will secure the dowel in place on your cord.
Step 6
Starting from your left, miss one rope and then pick up the second rope and the third rope in. A few inches below where you tied the knot in step 5, tie another knot in these two pieces of rope. Continue along, tying all ropes (hopefully) in a straight line.
Step 7
Continue knotting down the hammock. This will produce a netting pattern and create a surface that you will then lie on when using the hammock. When you have the same amount of cord left as is on the other side of the first dowel, stop knotting.
Step 8
Thread the bottom ropes through the holes in your second dowel, in a similar fashion to how the top dowel was completed.
Step 9
Take the loose ends and double knot them around the second o-ring. Leave enough rope that you can double knot securely.
Step 10
Voila! A hammock. Now you can take this bad boy outside for a spin, and attach it from holdings around your garden (or house - get imaginative!). If you don't have any pre-existing fixings, simply drill a hole and securely attach a couple of hook screws to keep it in place.
You may be also interested in these guides
Guide written by:
ManoMano Team,
ManoMano is the largest marketplace for products and services in the DIY, gardening and home improvement sector in Europe. Together, we are free to invent a sustainable future and committed to build it today. We are hands-on to improve our homes for tomorrow. Bold, from idea to action. Ingenious always & together. Responsible for people & our planet.
'/%3E%3C/svg%3E)