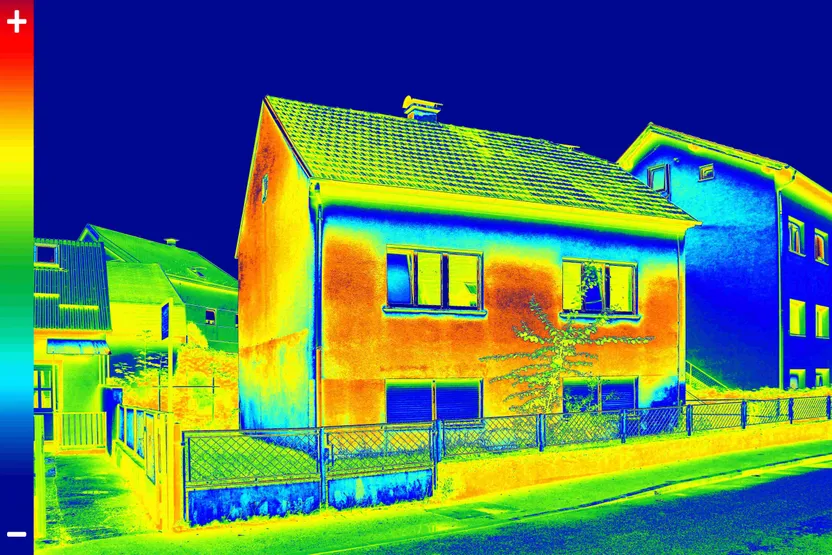
Thermal bridging: what is it and how can I solve it?
'/%3E%3C/svg%3E)
Guide written on 25 September 2026 by:
Jennifer, Self-taught DIY enthusiast, Manchester
Important features
- Thermal bridge causes
- Thermal bridging types
- Impact and regulations
- Treatment and insulation
Best sellers in this category
What is a thermal bridge?
A thermal bridge is a weak point in insulation that occurs at junctions between two or more elements used to construct a building. The heat loss caused by thermal bridges in the home is estimated at around 5 to 10%, but this value can go up to 30%.
The concept of thermal bridging is even more important in new builds built to rigorous insulation standards and passive houses since the more airtight the house, the greater the heat loss that can occur through thermal bridging and the more issues can occur.
Shop our insulation
What is thermal resistance?
R values (R)
The thermal resistance of a material is indicated by an R value which takes the thickness of the insulating material and divides it by is coefficient of thermal conductivity (or lambda value). The higher the R value, the better the material's thermal resistance to the transfer of heat flow.
Thermal bridges and insulation
Thermal bridges alter the thermal resistance of a building in specific areas causing heat loss. For efficient thermal insulation, the thermal resistance of a building's envelope must be continuous.
Thermal breaks must be incorporated into a building during construction or retrofitted later on if thermal bridging is found to occur. These low conductivity materials are designed to create a continuous barrier of insulation and reduce the occurrence of thermal bridges around the building envelope.
Best sellers in this category
What causes thermal bridging?
The building techniques and materials used to construct a building. Steel framed buildings and those with concrete slabs have a higher risk of thermal bridging than timber structures.
Intermediate floor structures.
Elements that penetrate through the construction (beams, studs, joists, etc.).
The complexity of the architecture (lots of corners, etc.).
What are the different types of thermal bridges?
Linear or non-repeating bridges which occur at junctions between two elements (walls, floor junctions, beams, windows or doors, etc.).
Point thermal bridges are the result of single penetrations in the building envelope such as wall plugs, studwork, screws and so on.
Repeating thermal bridges repeat at a regular pattern throughout the building envelope (e.g. wall ties or joists).
Timber and joinery
What is the impact of thermal bridging on a building?
Heat loss of up to 30%.
Higher energy bills.
Negative environmental impact.
Failure to meet insulation standards.
Risk of structural cracks.
Tendency for corrosion.
Mould growth.
Condensation.
Negative impact on overall comfort.
Thermal bridging and building regulations
As buildings become more energy efficient with improved insulation, the need to tackle thermal bridging has become increasingly obvious.
Thermal bridging is therefore a key point of focus to the recent updates to Part L of the Building Regulations which state that "The building fabric should be constructed so that there are no reasonably avoidable thermal bridges in the insulation layers [...]."
The crack down on thermal bridging is all part of the Future Homes and Buildings Standard which requires that all new build homes be zero carbon by 2025.
How to solve thermal bridges
Continuous and efficient thermal insulation is important for both new builds and older buildings, and it is therefore essential to prevent thermal bridging and to treat it wherever it occurs. The solution lies with using insulating materials which vary depending on the junction to be treated.
There are three ways to deal with thermal bridging:
Interior insulation used at junctions between floors/walls/roofs.
Exterior insulation used for the same areas as well as more specific areas such as around terraces, fireplaces, parapets, balconies and so on.
Using both interior and exterior insulation.
Thermal bridges in new builds
For individual new builds, the easiest and most economic system to put into place during construction are things like thermal blocks and thermal flooring systems complete with thermal breaks. Thermal breaks, or barriers, are made of insulating materials like polyurethane, expanded polystyrene, and compressed rock wool.
Concrete floor/wall junctions
Under slab thermal barriers;
Precast beam and block floors. This solution involves laying concrete beams with thermal breaks across or between walls and infilling the gaps with insulated blocks.
Interior insulation solutions
Floor/wall junctions
Laying a floating screed floor over an interior surface to insulate an uninsulated crawl space.
Reinsulating walls and ceilings to ensure continuous insulation taking special care around junctions and corners.
Insulating intermediate floors (e.g. lofts or between storeys and crawl spaces) to create continuous insulation.
Wall/roof and wall/door and window junctions
Covering timber truss, rafters and purlins with a second layer of insulation (the first being in the loft). This layer of insulation should be fitted from the roof to the floor of the loft using highly insulating materials such as semi-rigid polyurethane panels to save space.
Insulation should be fitted to partition walls where they meet external walls (about 60 cm of insulation).
Insulation should be added all around door and window openings.
Exterior insulation solutions
External wall/ground floor junctions
Insulation can be buried to the equivalent of about twice the width of the wall using rot-resistant and compression-proof materials like cork, foam glass or EPS at the junction between exterior walls and solid ground floors.
The same kind of insulation can be buried to a minimum of 60cm under a floor at the junction between exterior walls and floors over crawl spaces or accessible basements.
The same kind of insulation can be extended beneath concrete slab + internal insulation of a floor and walls as an extra layer.
Wall/roof junctions
Sarking can be employed to insulate the entire roof surface from the outside extending down to the walls. This technique allows you to leave as much interior space as possible for a loft space or to leave your beams on show for aesthetic reasons.
Insulation can be added to gable end walls at the roof level.
Insulation can be added to roof eaves.
A non-combustible insulation sleeve should be fitted to the junction between the flue and roof.
Wall/door and window openings
In a new build, windows generally perform best when installed within the insulative wall layer.
If this isn't an option, extra insulation should be added to the window reveals.
Insulating other areas
Terrace/balcony and wall junctions
Whether you're insulating internally or externally, only thermal breaks within the structural elements will work here. For balconies, the best system is thermally insulated balcony connectors.
For insulated roof terraces a block and beam construction with thermal breaks will be most practical solution.
Shop our insulation
More information on insulation
You may be also interested in these guides
Guide written by:
Jennifer, Self-taught DIY enthusiast, Manchester
I didn’t receive any special training, I learned everything on the job. And what a joy it is to be able to do little jobs around the house that we love so much. That is, until the moment we decided to move and had to do everything; from the floor to the ceiling, from the kitchen to the bathroom...In short, you become as good as a pro. So today, my friends don’t hesitate to call me when they need help. And when you dip your toe in, there’s no turning back. It’s a true passion that drives us to take on the challenges, to have an idea in mind and see it come alive with just a few tools. And a passion is even better when you can share it. So, whenever I can give you a little advice, it’s with great pleasure.
'/%3E%3C/svg%3E)